What is SmartQuality?
SmartQuality is a comprehensive project-based quality management system designed for the construction industry.
It digitizes Swedish construction quality control practices and provides a complete system for
planning, executing, and documenting quality controls on construction sites.
🎯 Key Benefits
- Digitize Quality Control: Transform paper-based kontrollplaner into efficient digital workflows
- Mobile-First Execution: Field workers can execute controls offline and sync when connected
- AI-Assisted Planning: Generate control items and checklists based on your technical description and requirements
- Complete Traceability: Full audit trail with timestamps, signatures, and evidence documentation
- BIM Integration: Link quality controls to 3D models and construction parts
- Regulatory Compliance: Maintain traceability to Swedish standards
⚠️ Important: SmartQuality is NOT a Standards Library
SmartQuality is a quality execution system that helps you plan, execute, and document quality controls.
It creates control plans based on your projects requirements. The system maintains
traceability to standards while respecting intellectual property rights.
Getting Started
Accessing SmartQuality
- Web Application: Access SmartQuality through your web browser at your organization's SmartQuality URL
- Mobile App: Download the SmartQuality Field mobile app from App Store or Google Play for field execution
System Requirements
- Modern web browser (Chrome, Firefox, Safari, Edge)
- Internet connection
- Minimum screen resolution: 1280x720
- iOS 13+ or Android 8+
- 100MB free storage space
- Camera access for photo evidence
- Optional: Internet connection (works offline)
Project Management
Create and manage construction projects with full traceability and team collaboration.
Each project includes customizable disciplines and comprehensive project details.
Creating a New Project
-
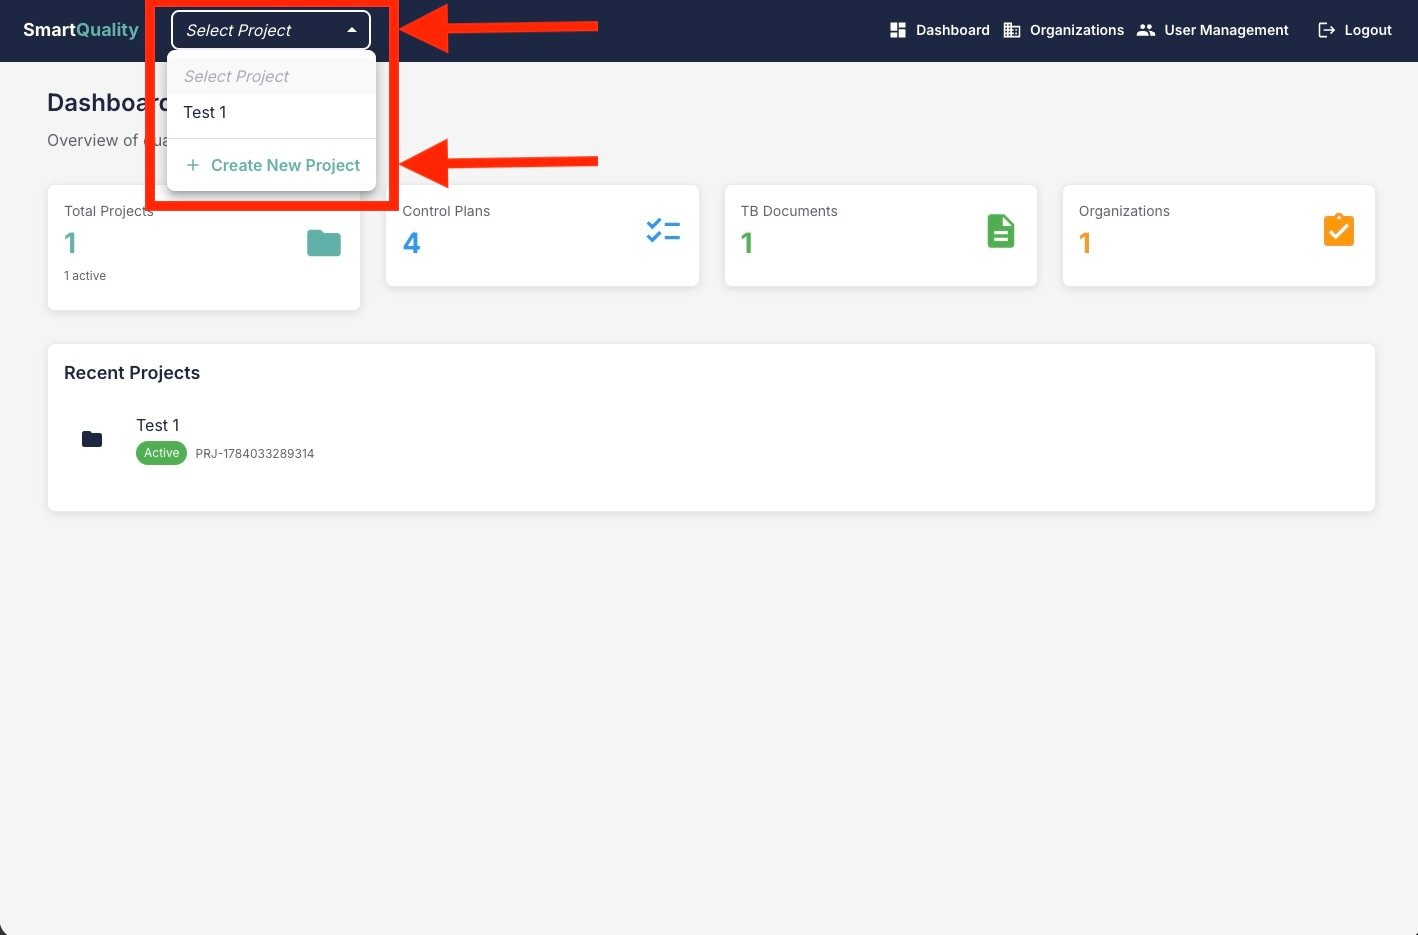
Access Project Creation: Click the project chooser dropdown
in the header navigation bar, then select "Create New Project"
-
Enter Project Details: Fill in the project information form:
- Project Name: Descriptive name for your project
- Description: Brief overview of the project
- Client: Client organization name
- Contractor: Contractor organization name
Click "Create Project" to proceed.
Configuring Project Settings
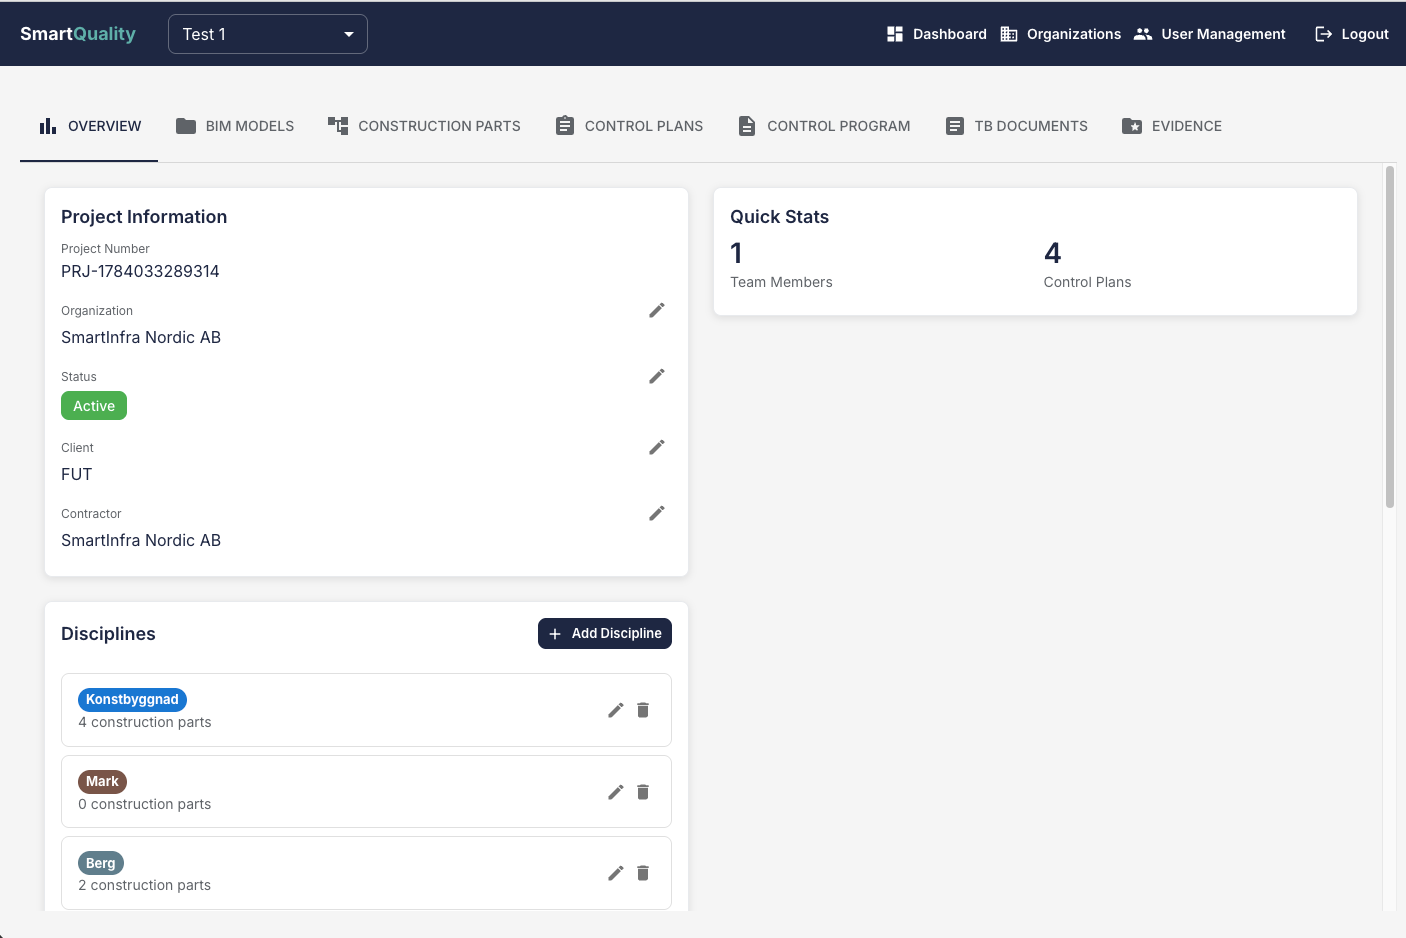
After your project is created, you can access the project dashboard to edit the project
information and update project details as needed.
Setting Up Disciplines
In the project dashboard, configure the disciplines applicable to
your project. SmartQuality includes a comprehensive set of standard construction disciplines
pre-configured for your convenience.
Managing Disciplines:
- Use Standard Disciplines: A complete list of common construction disciplines
is already set up and ready to use
- Edit Disciplines: Modify names or descriptions of existing disciplines
to match your project terminology
- Remove Disciplines: Delete disciplines that are not applicable to your project
- Add Custom Disciplines: Create new discipline categories specific to
your project requirements
💡 Tip: Disciplines help organize control plans, inspections, and quality
documentation by construction trade or specialty. Customize the discipline list during
project setup to streamline your workflow.
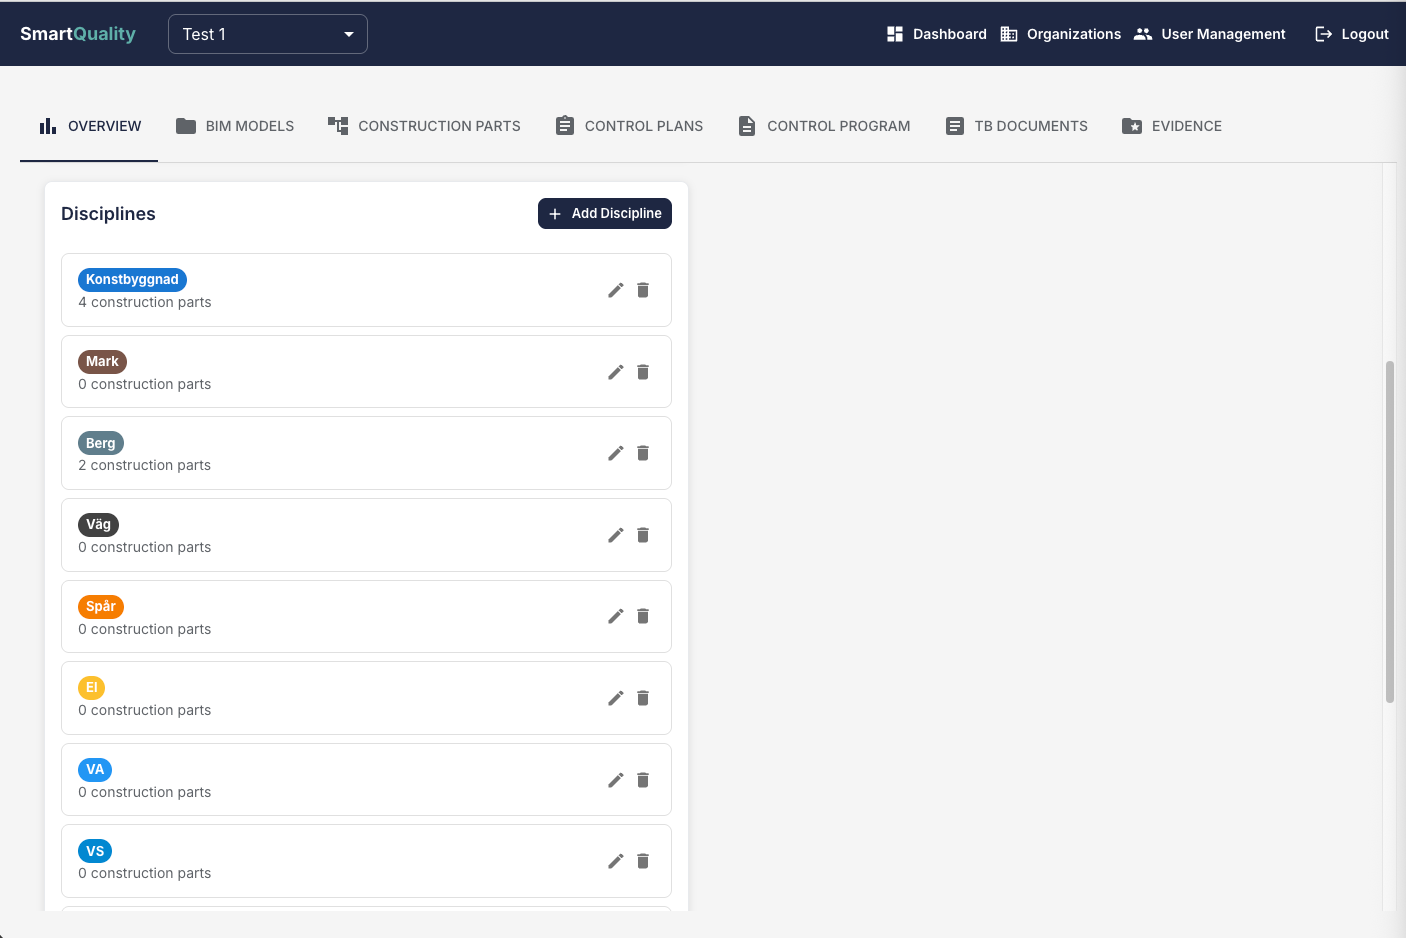
Example disciplines list (partial view)
BIM Model Management
BIM model management in SmartQuality involves creating organized folder structures and defining
logical construction units that connect to quality documentation throughout the quality execution process.
Creating BIM Model Folders
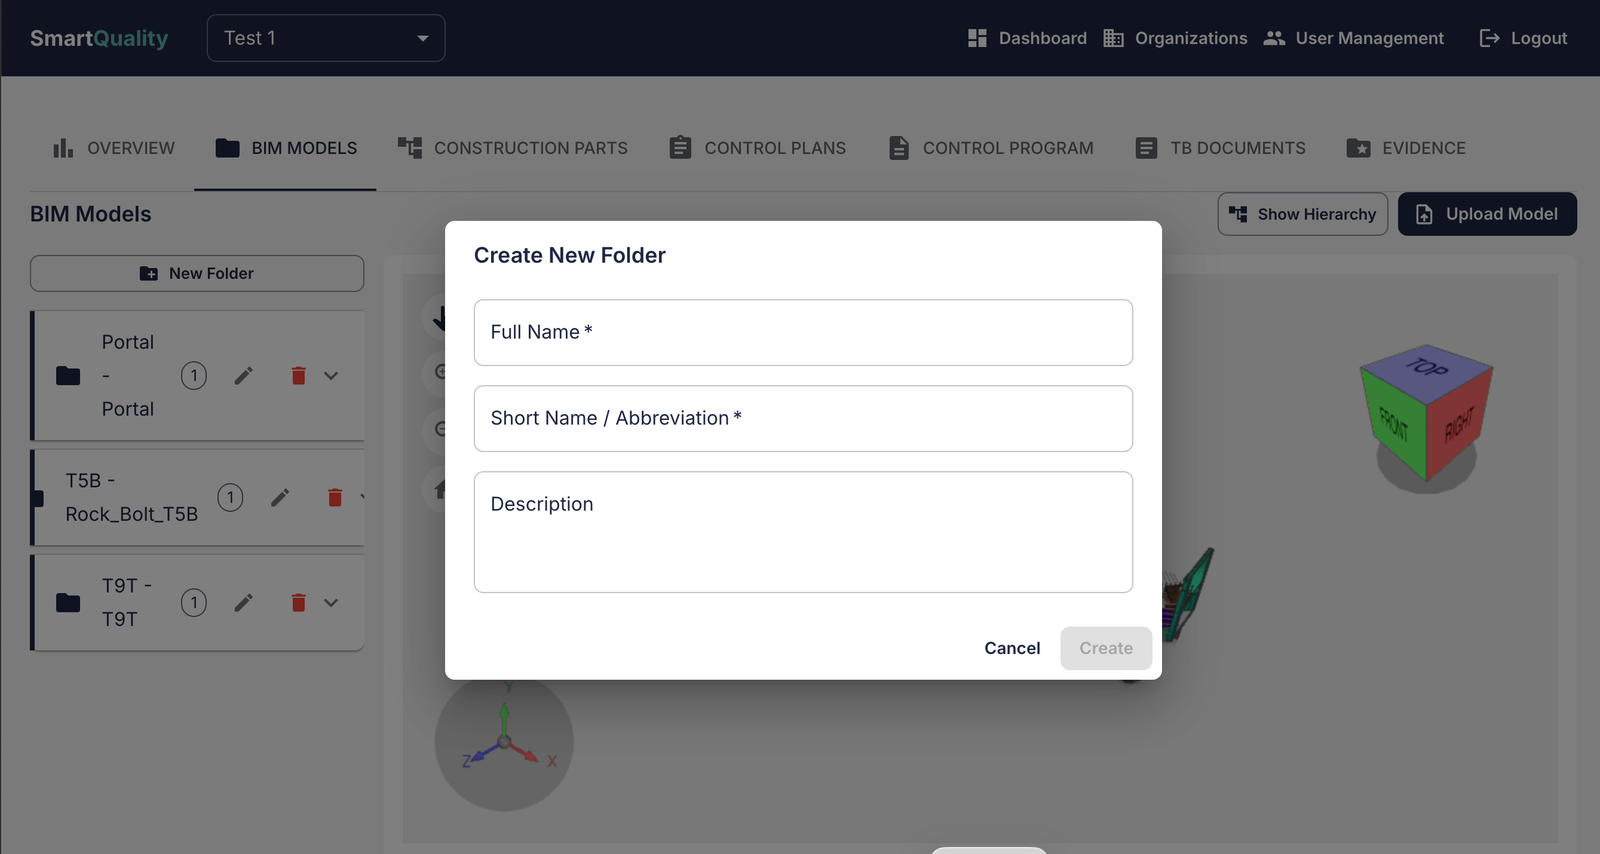
⚠️ Important: Folder naming and structure is critical as it will be used to
name and track IFC elements throughout the entire quality execution workflow.
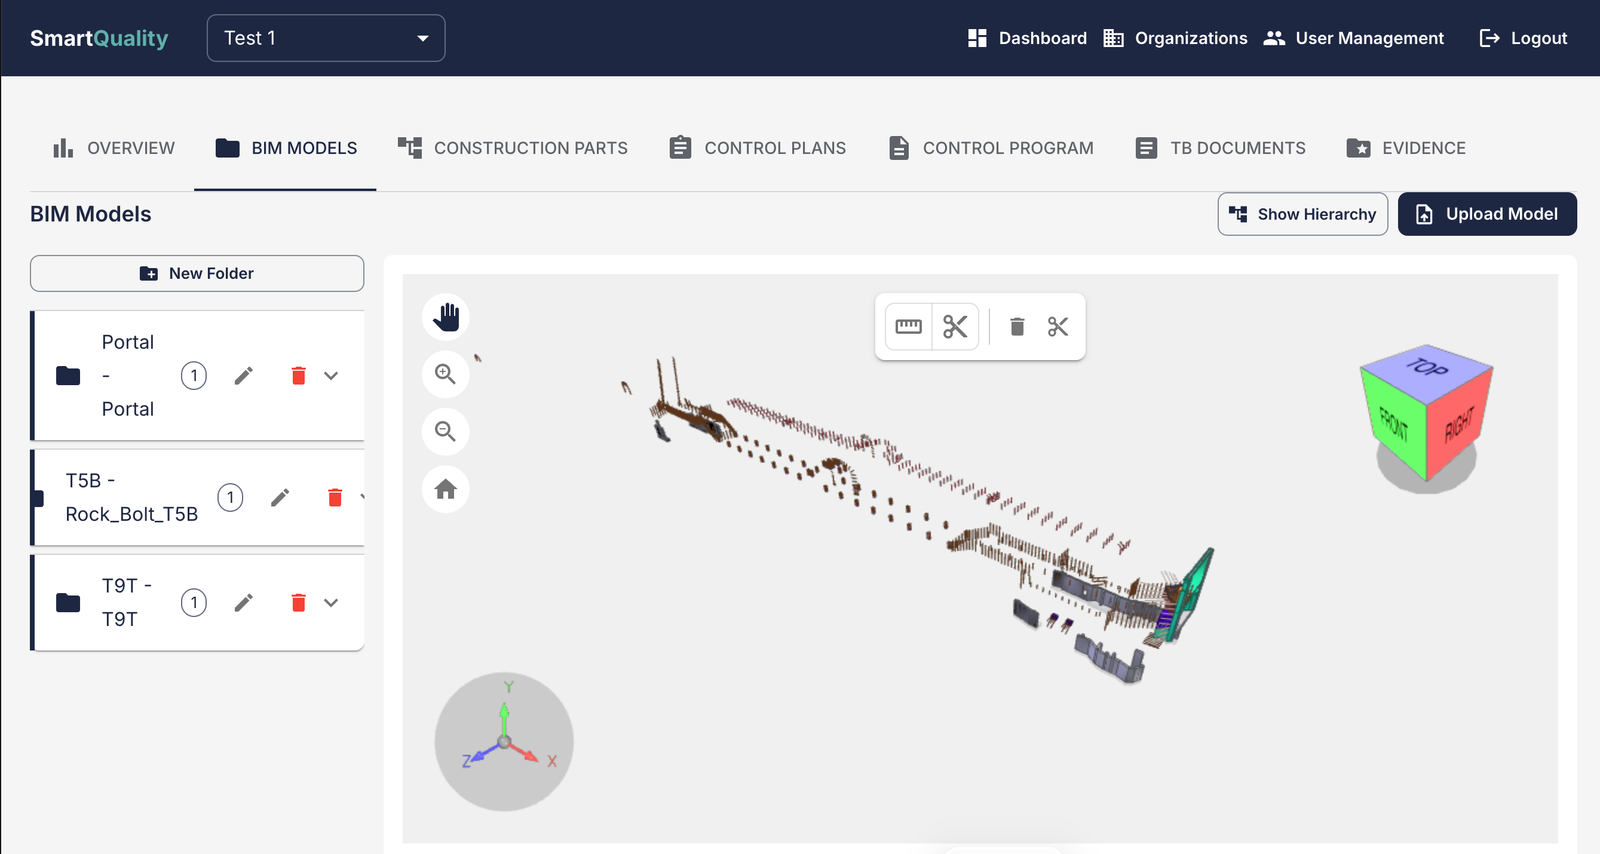
Start by creating a well-organized folder structure for your BIM models. This organization
will help you manage multiple model files and versions efficiently.
Upload your IFC model files by dragging and dropping them into the created folders.
The system supports IFC format.
Note: Large files may take several minutes to process.
Creating Construction Units/Parts
After uploading your BIM models, create logical construction units that will be connected to
quality documentation defined in your control plans. This is a critical step for effective
quality management.
Example: Concrete Works
For concrete works, create casting units - units that will be cast at once.
Each casting unit will be assigned one checklist and the necessary number of reception controls.
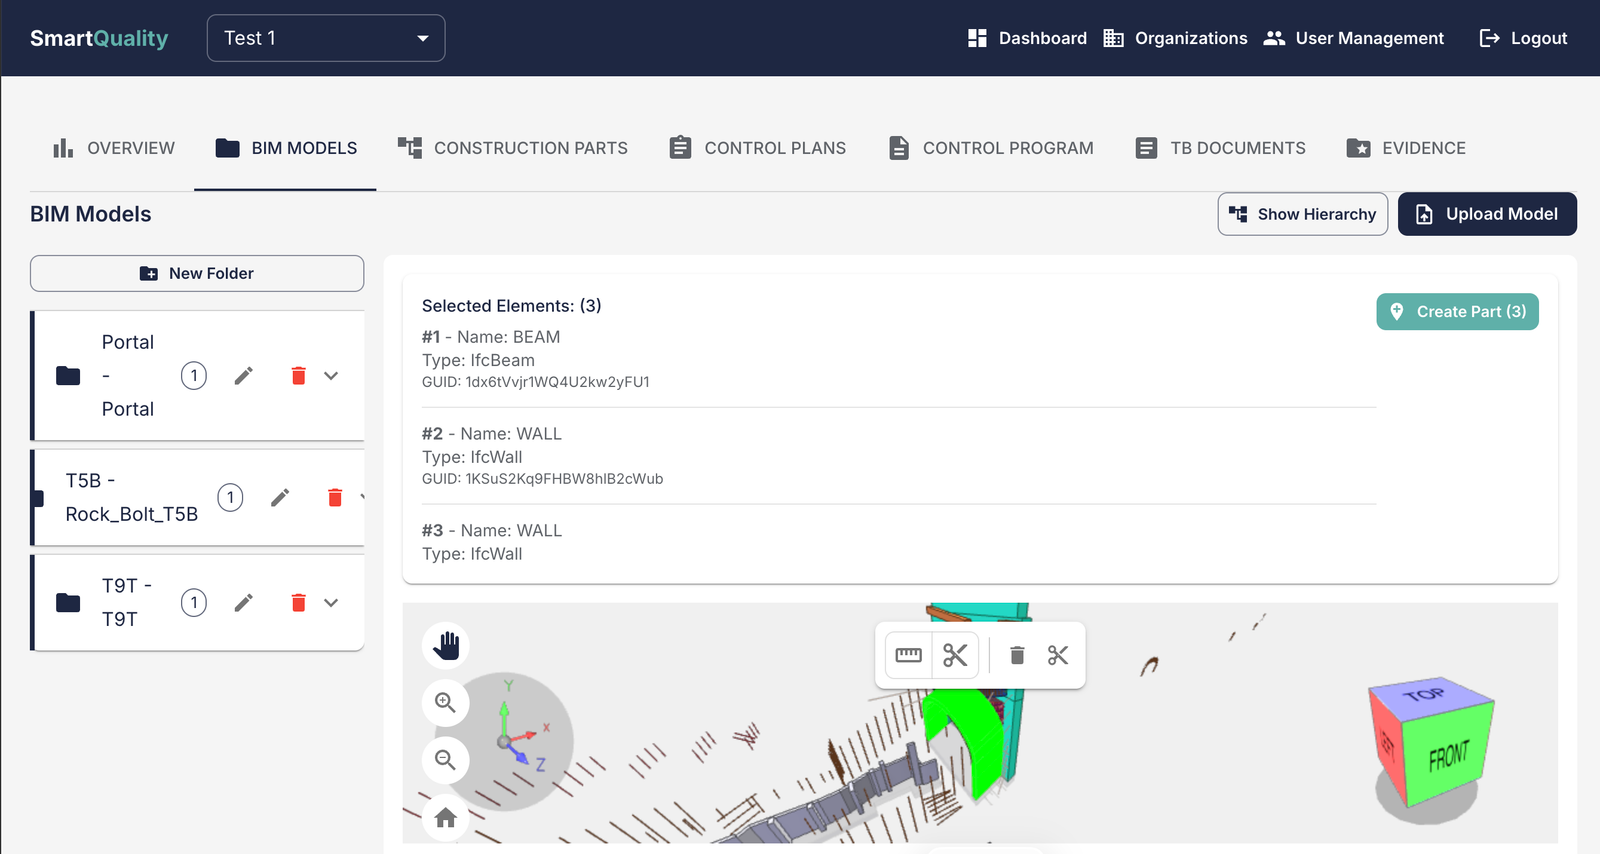
Selecting Elements in the Model
- Open the 3D model viewer
- Click on elements in the model to select them
- Hold down Ctrl (Windows/Linux) or Cmd (Mac)
to multi-select elements
- Select all elements that belong to the same construction unit
- Click "Create Part" to assign the selected elements to one
construction unit/part
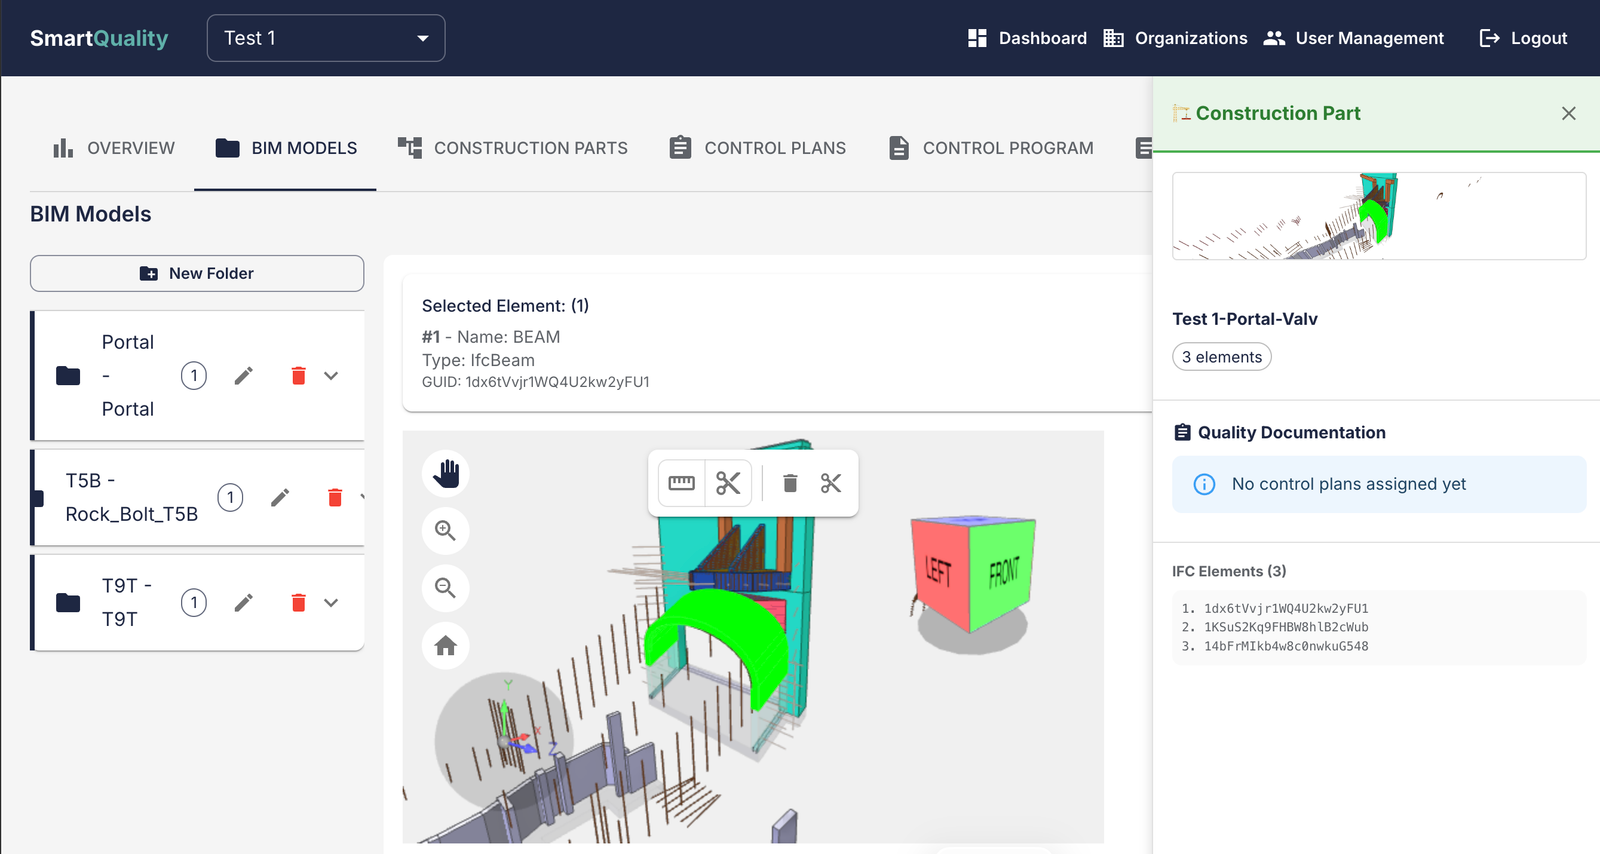
Viewing and Managing Construction Parts
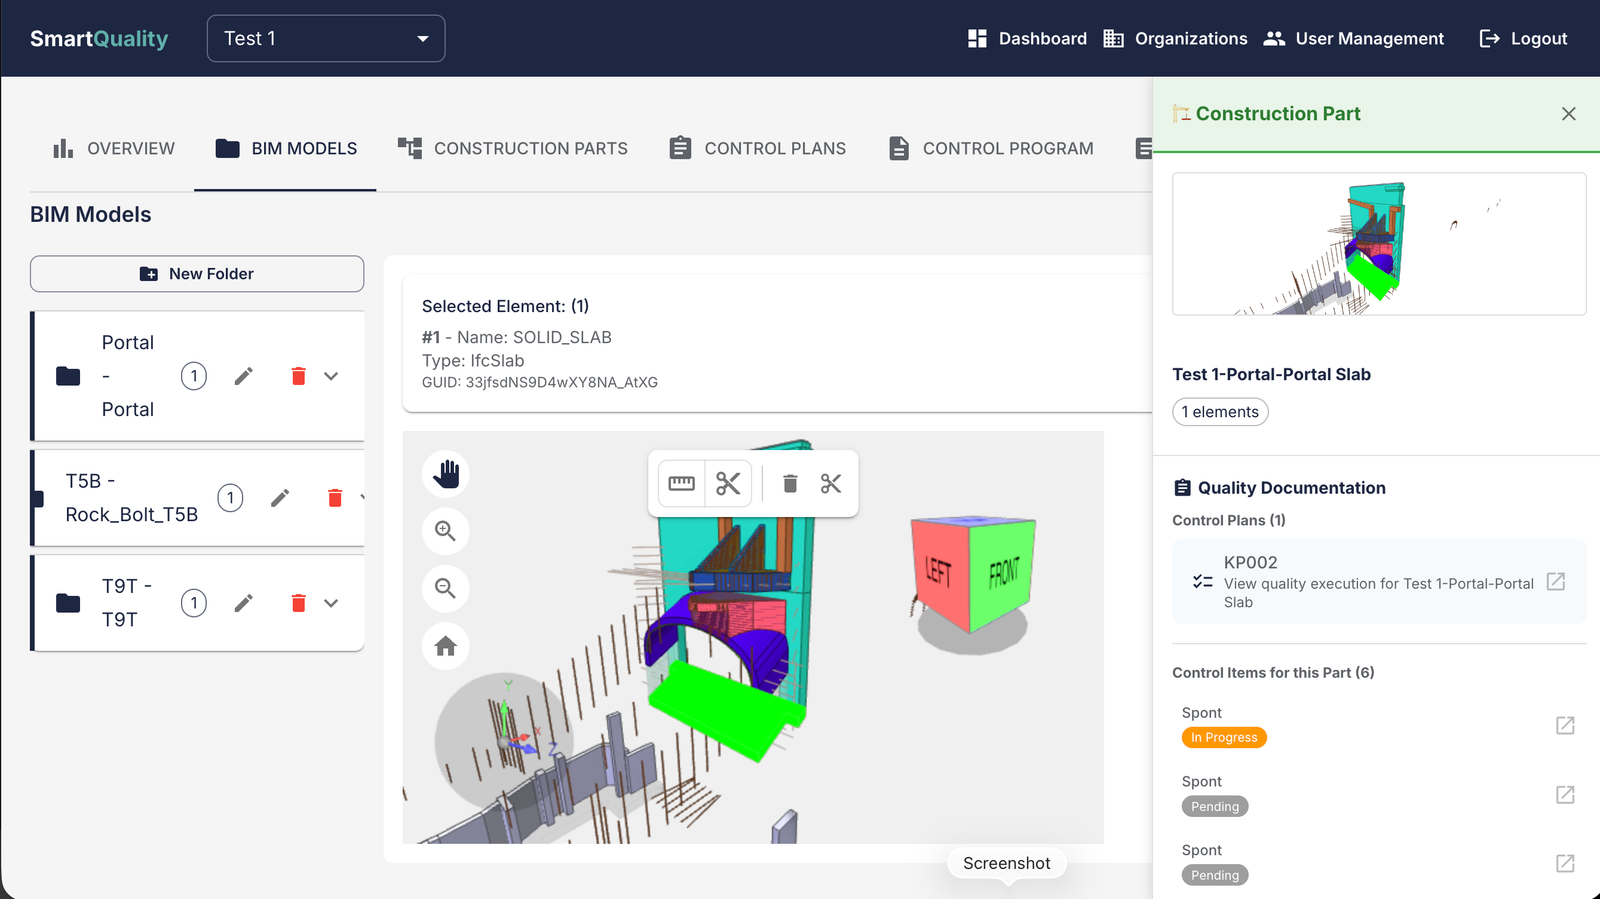
Once elements are assigned to a construction unit/part, they appear transparent in the model.
You can interact with these elements to view and manage their assignments:
- Click on any element to see its assignment information
- View which construction part the element belongs to
- See which control plan is assigned to the part
- Access assigned control plans directly from this view
- Edit construction parts as needed
The element information panel shows complete traceability, including control plan assignments
and quality documentation links. Construction parts remain editable throughout the project lifecycle.
Complete Traceability
All construction parts store the selected IFC element GUIDs, ensuring complete traceability
from the 3D model through quality execution to final documentation.
TB Documents & AI Extraction
This is a critical step that defines the quality of your entire quality documentation.
SmartQuality's AI assists with extracting quality requirements from your technical descriptions (TB),
while maintaining user control throughout the process.
⚠️ Important: User Control & Copyright
The AI performs the heavy lifting of extracting requirements, but you maintain full control.
All extracted requirements must be reviewed and approved before use. Only upload documents you have
legal copyright access to.
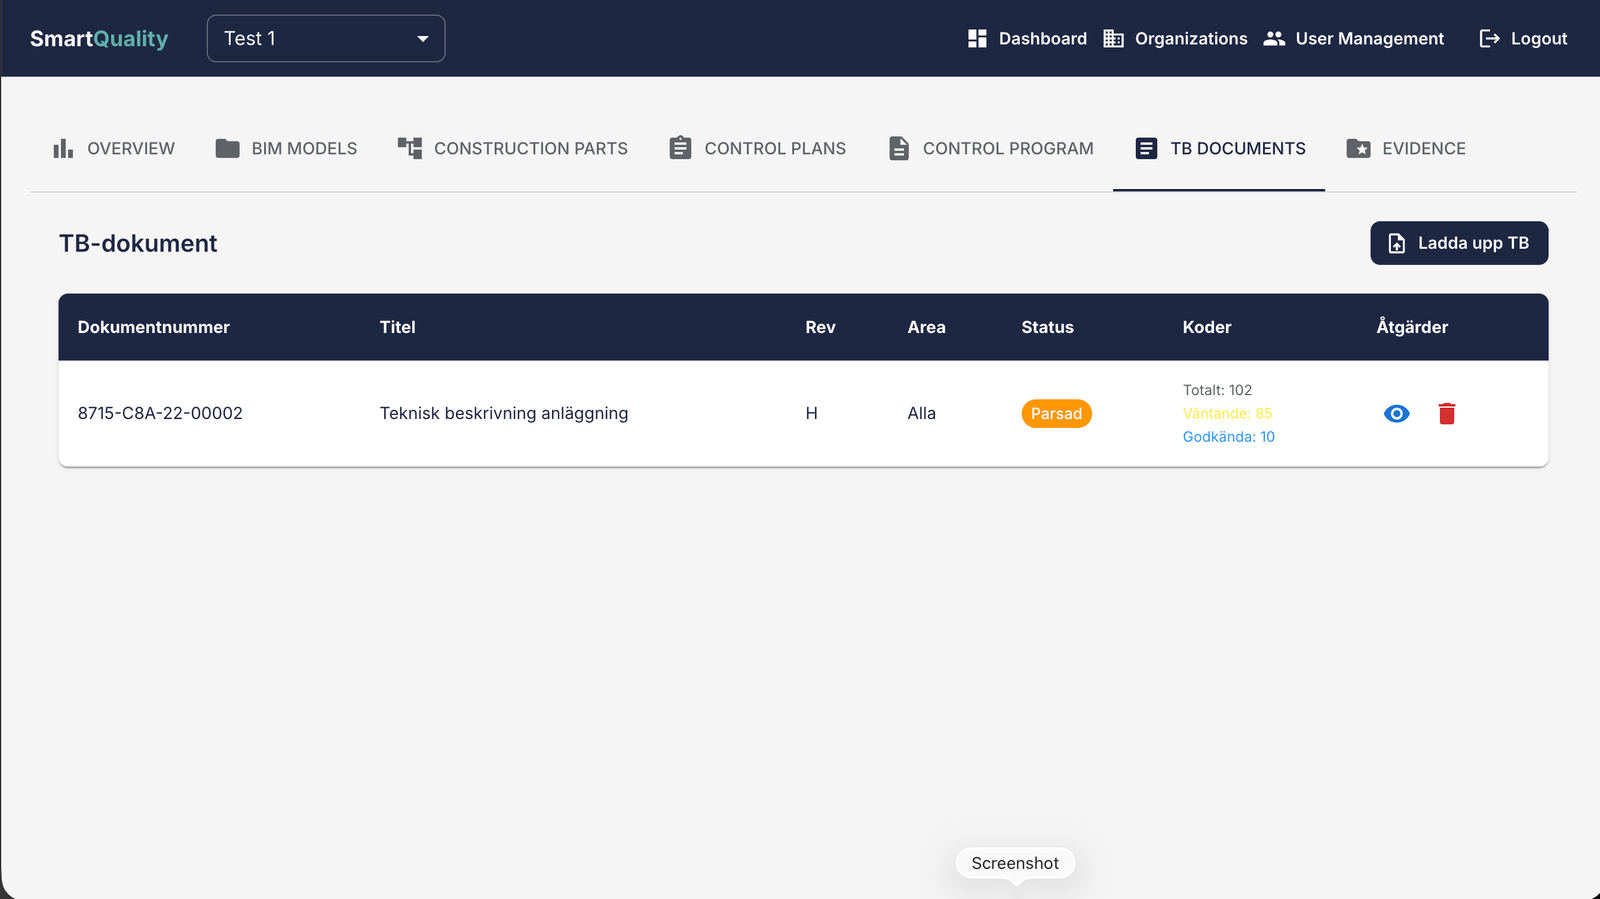
Step 1: Access TB Documents Tab
Navigate to the TB Documents tab in your project. This is where you'll
manage your technical descriptions and extract quality requirements using AI.
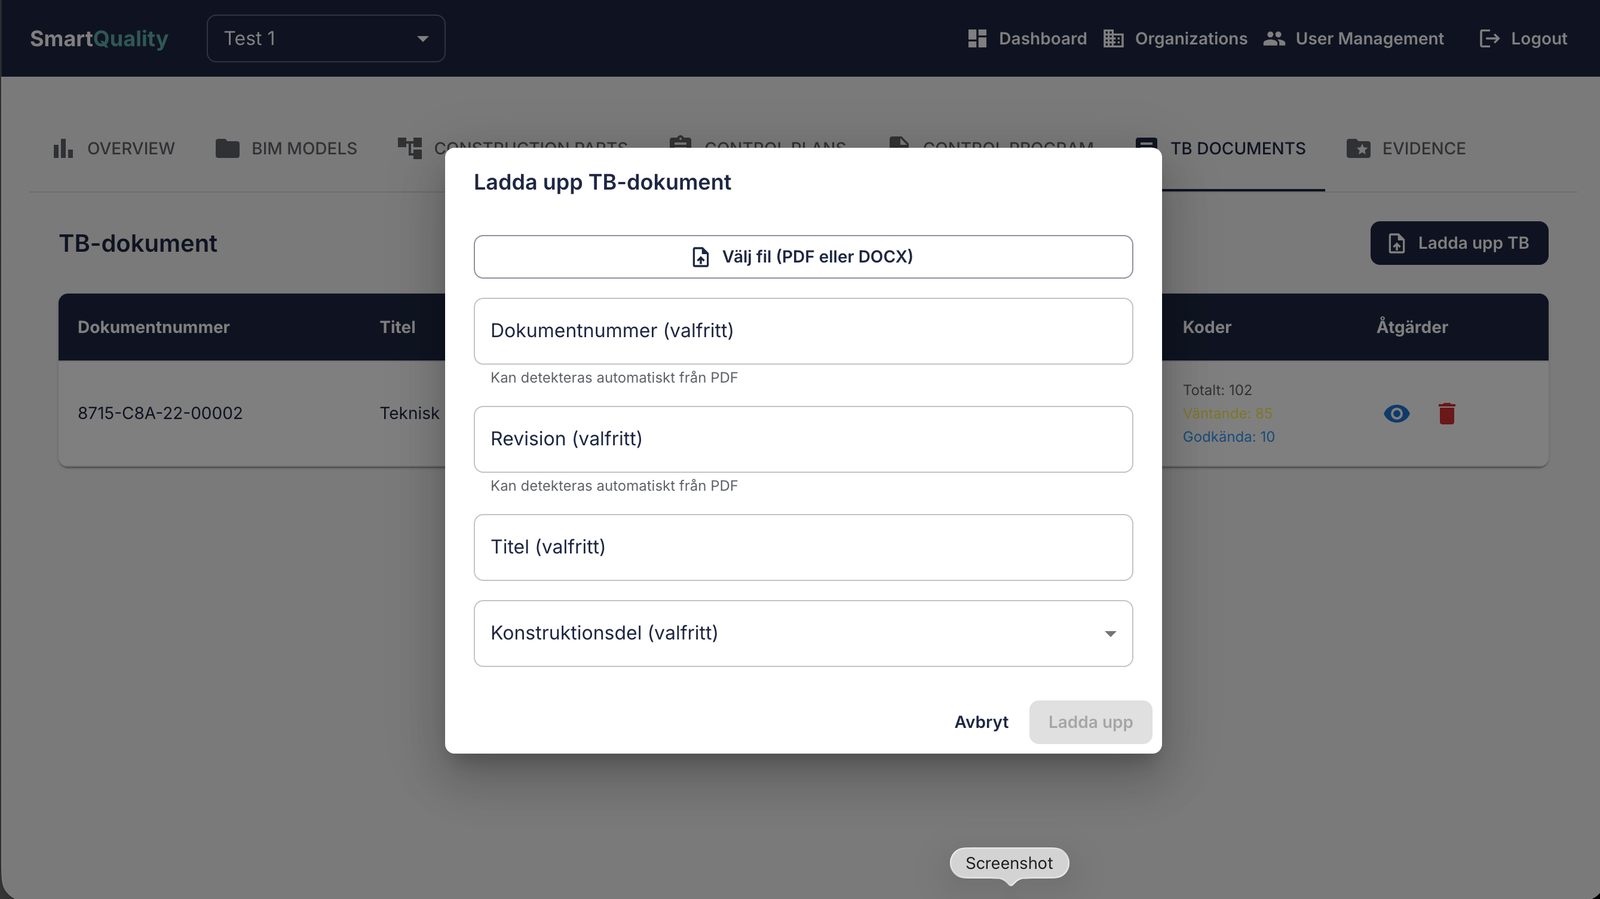
Step 2: Upload Technical Description
Upload your project's technical description (TB) document. The system will prepare it for
AI-assisted extraction of codes and quality requirements.
- Click "Upload Document"
- Select your technical description file
- Wait for upload to complete
Step 3: Extract Codes from Document
Run the extraction process to identify all regulation codes and references in your TB document:
- Click the play button next to the view button to start extraction
- Wait for the AI to extract all text and identify codes
- Click "View" to open the document and AI workflow window
Step 4: Extract Requirements with AI
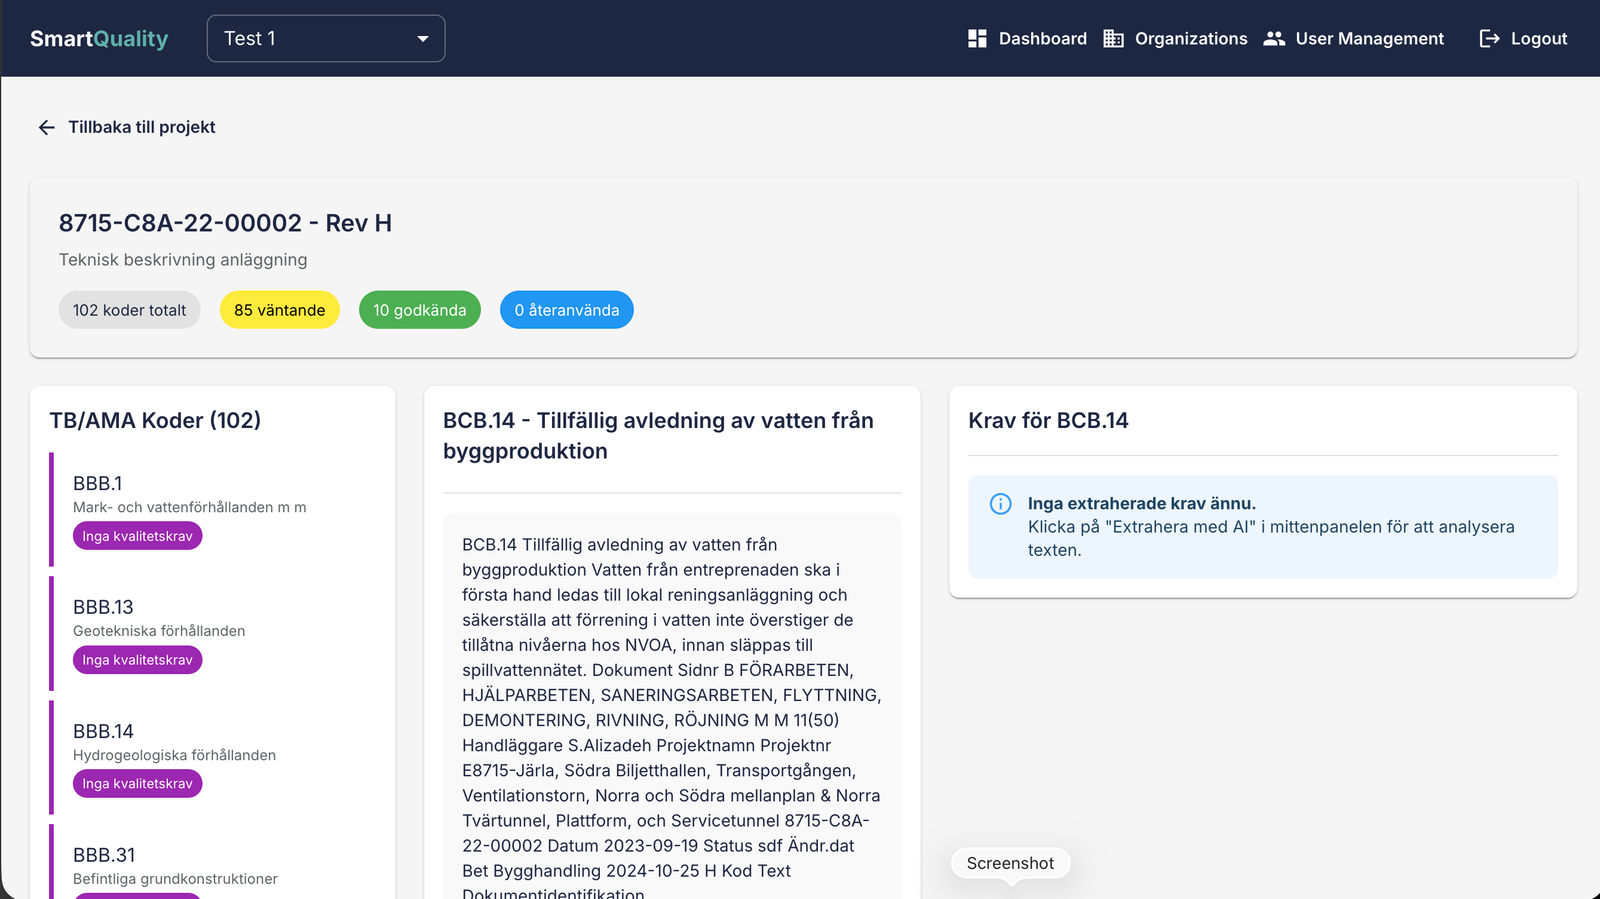
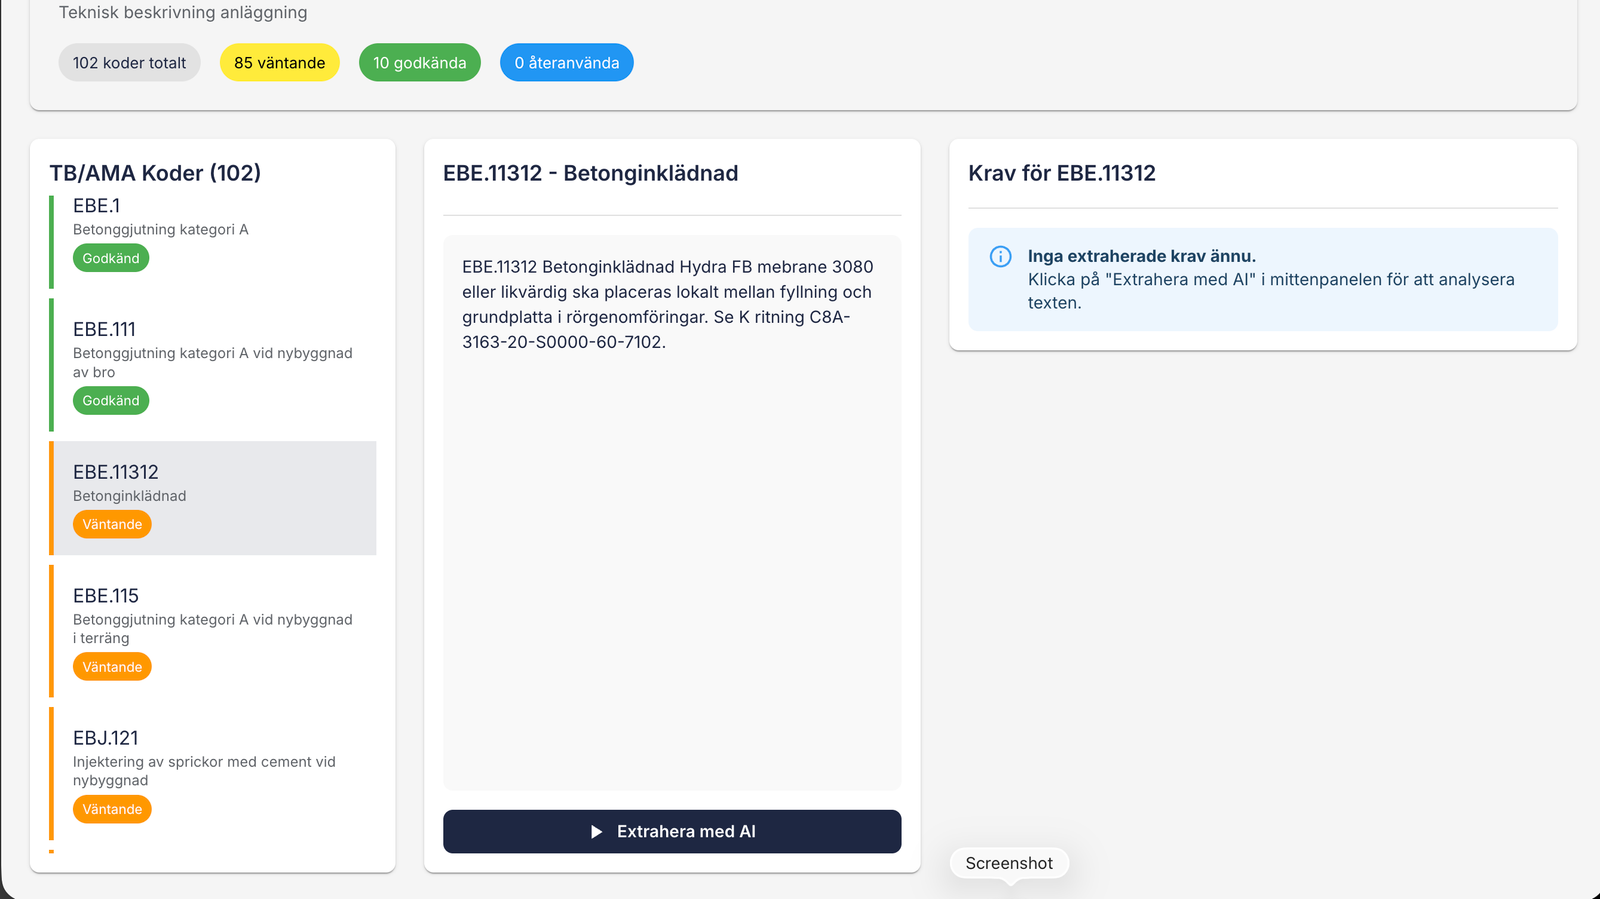
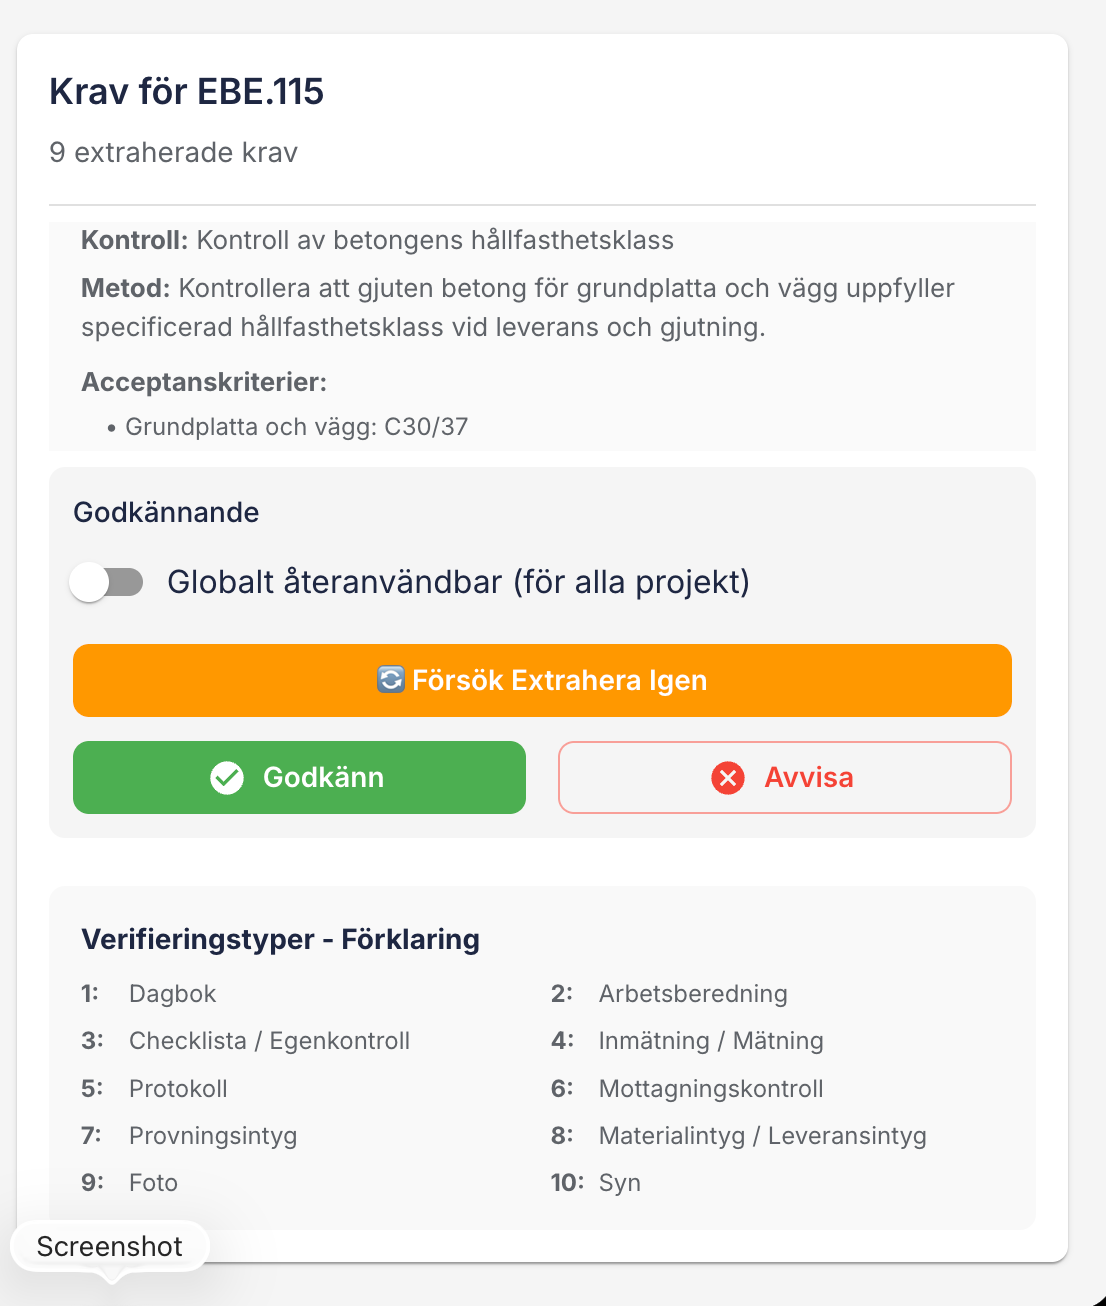
On the left side, you'll see all codes extracted from the TB. For each code:
- Click on a code to select it
- Click "Extrahera med AI" (Extract with AI)
- The AI will extract the text and quality control requirements for that code
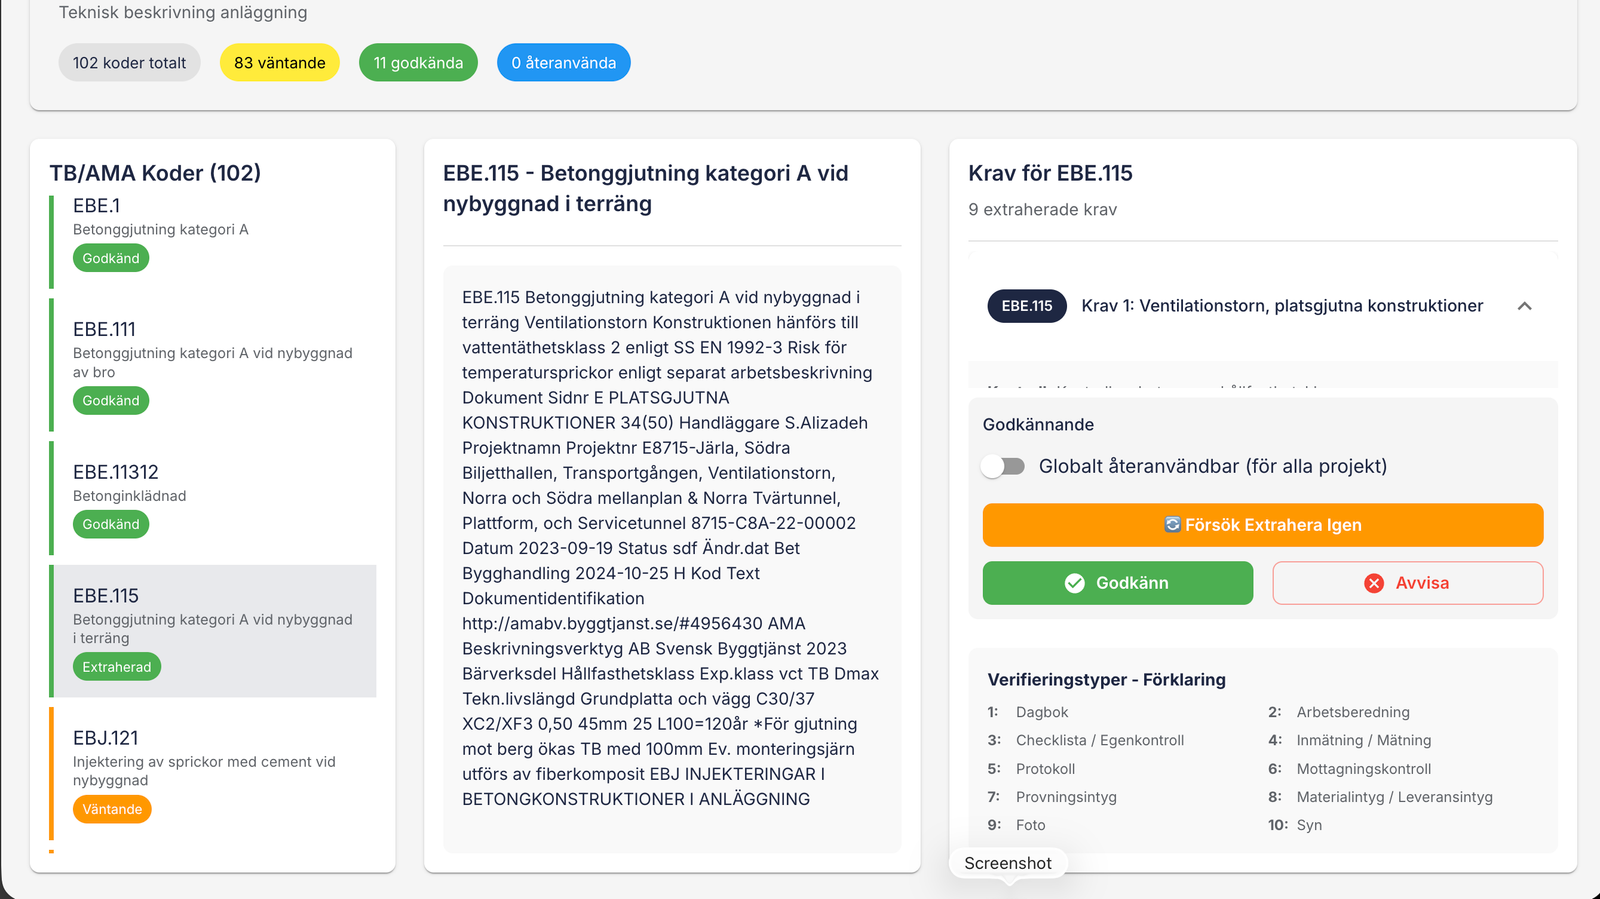
- Review the extracted requirements in the right window
Step 5: Review and Approve Requirements
Critical Step: All extracted requirements appear in the right window where
you can edit them before saving. This is where you define the quality requirements that will
be used in control plans.
- Review each extracted requirement carefully
- Edit requirements as needed to ensure accuracy and completeness
- Once satisfied, click "Accept Criteria"
- Repeat for all extracted codes
💡 Important: These requirements will become the foundation of your control
plans. Take time to review and refine them carefully.
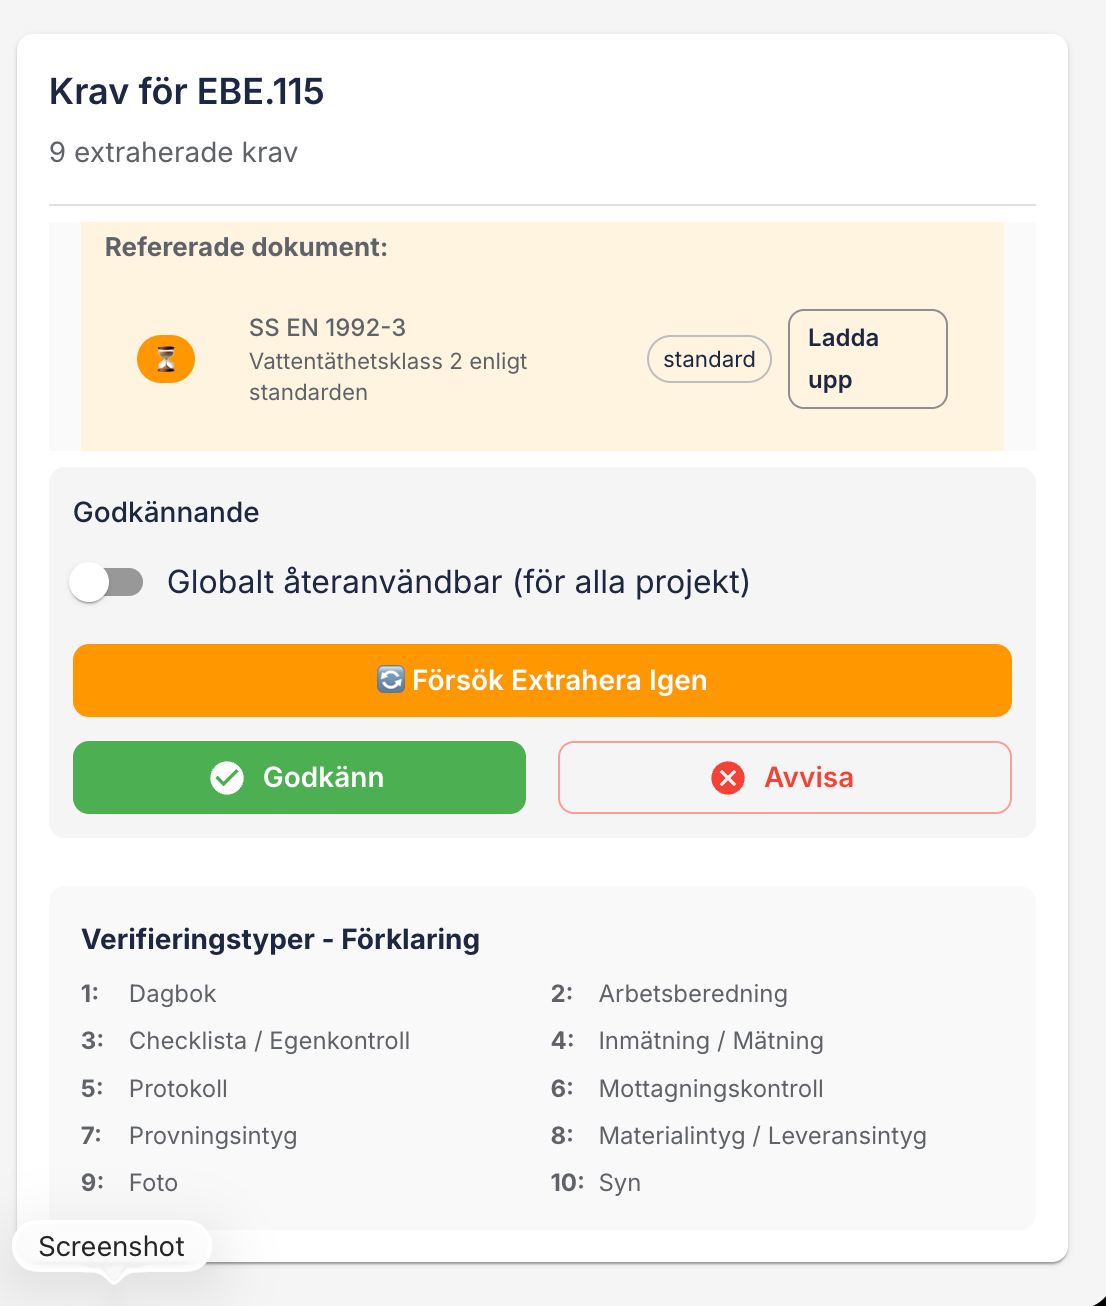
Step 6: Add Supporting Documents (Optional)
If a code refers to other documents (such as drawings or technical specifications), you can
upload those documents for additional AI analysis:
- Select a code that references another document
- Click "Upload Supporting Document"
- The AI will analyze the document and check for additional requirements
- Review and approve any additional requirements found
⚠️ Copyright Notice: Only upload documents you have legal copyright access to.
You are responsible for ensuring you have the right to use these documents.
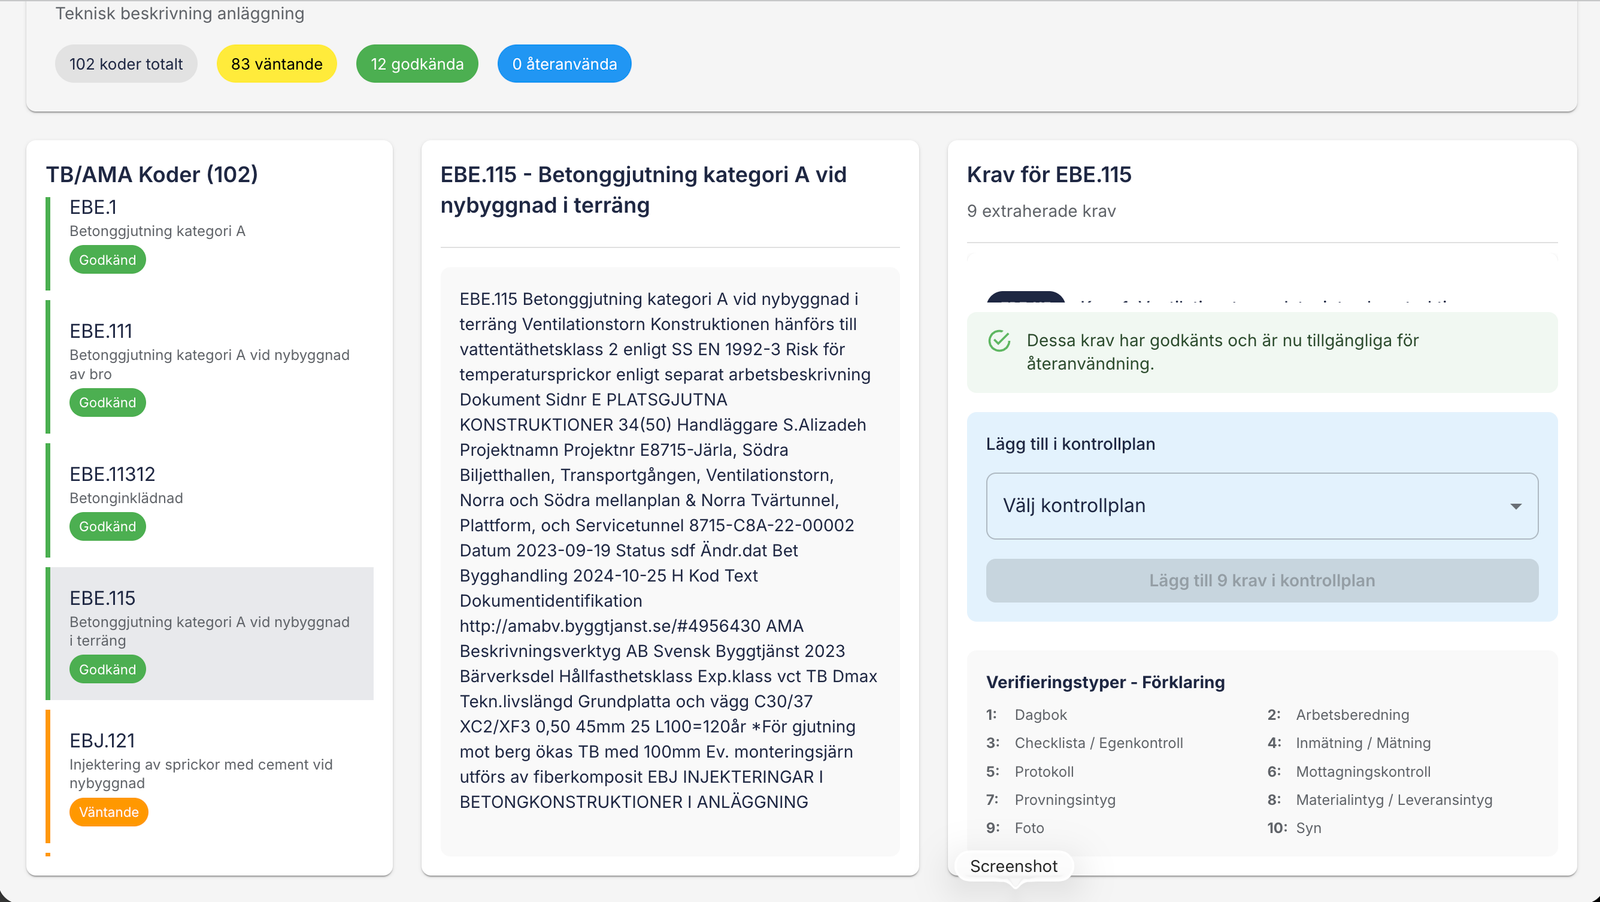
Step 7: Add Requirements to Control Plans
Once all requirements are approved, you can add them to control plans:
- From TB Documents view: Select requirements and add them directly to a control plan
- From Control Plans view: Reference and add approved requirements when creating control items
This ensures your control plans are based on verified, project-specific quality requirements
extracted from your technical documentation.
Control Plans (Kontrollplaner)
Control plans define the quality requirements and inspection procedures for your construction parts.
SmartQuality streamlines the entire process from assigning parts to control plans, adding requirements
from your TB documents, approving plans, and automatically generating quality documentation.
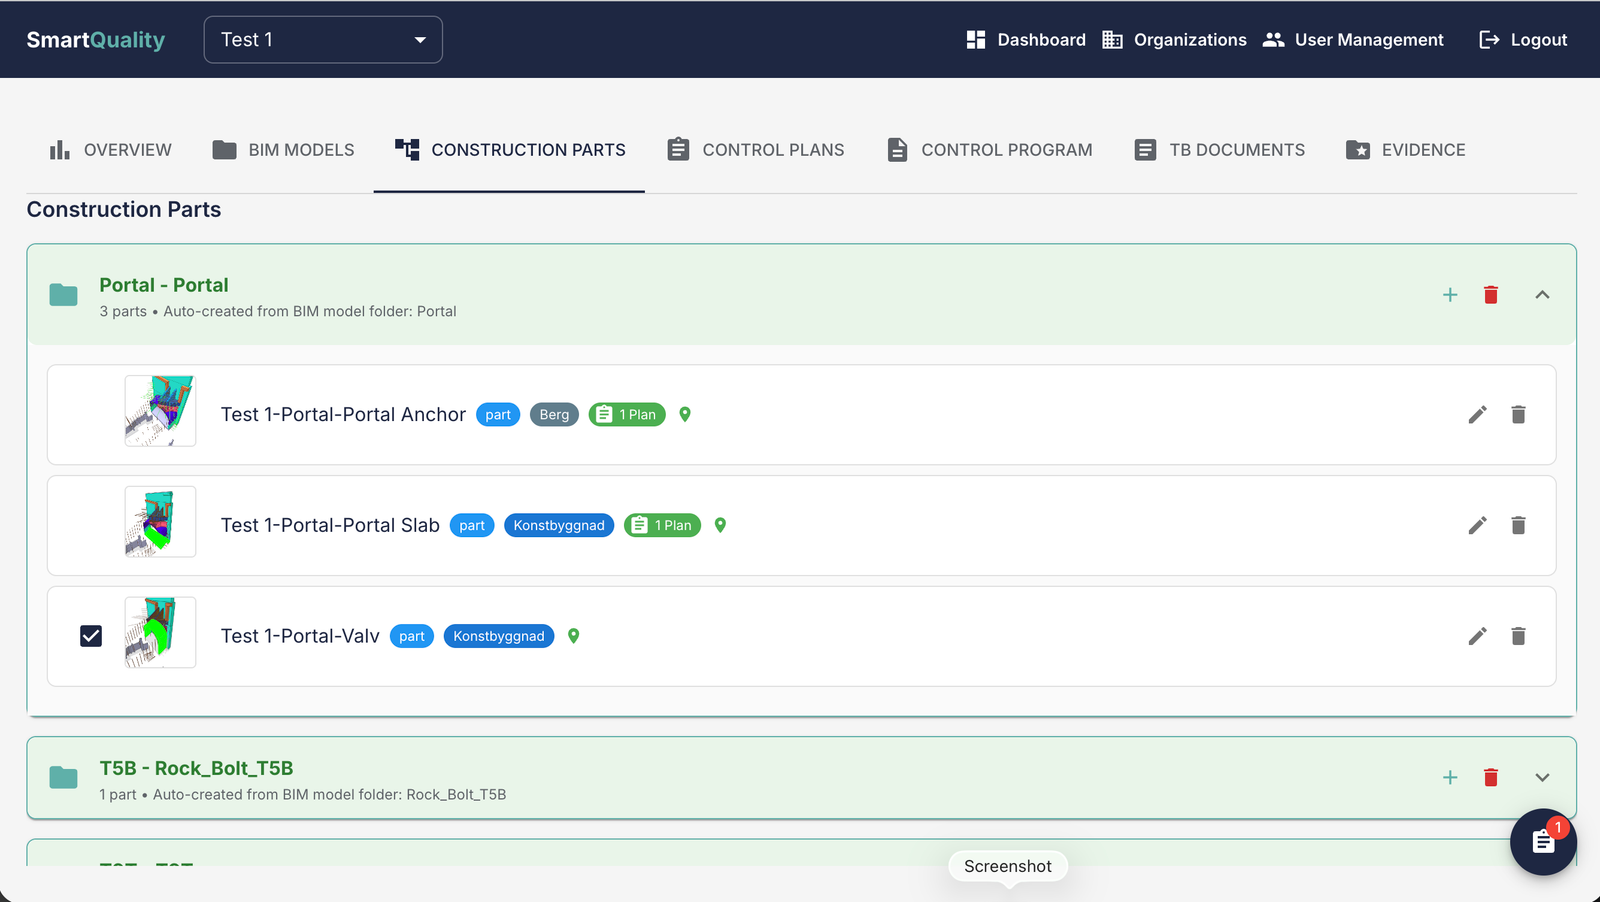
Step 1: Access Construction Parts
Navigate to the Construction Parts tab. This page is automatically created
using the folder names you defined in the BIM Model view, ensuring complete traceability
throughout the project.
Each construction part needs to be assigned to a control plan before you can add quality requirements.
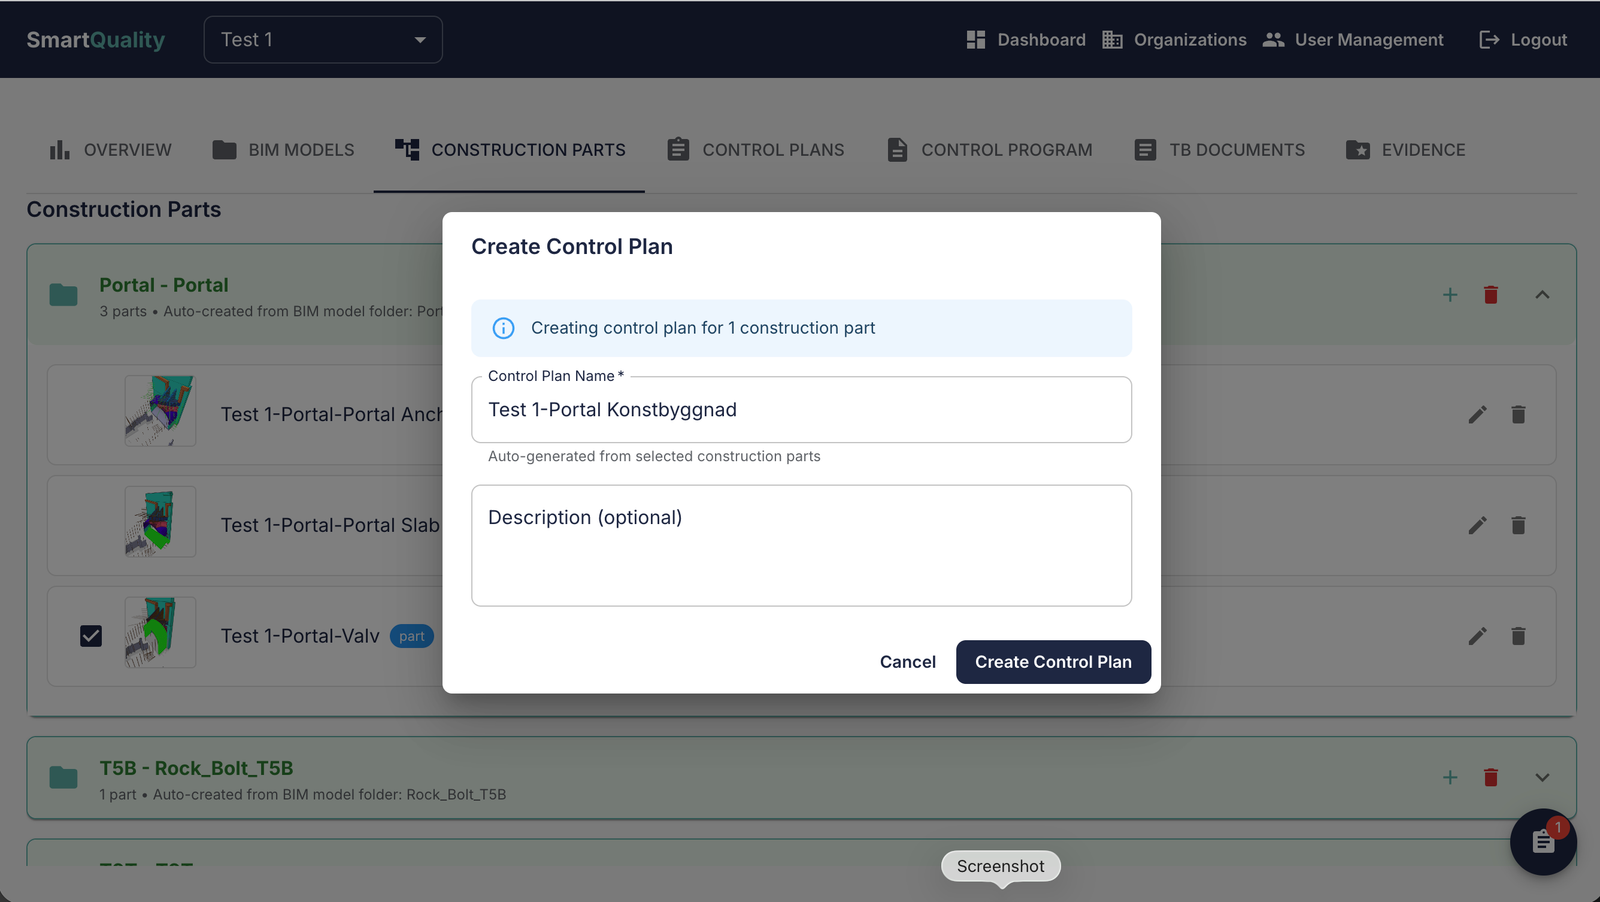
Step 2: Assign Parts to Control Plans
You have two options for assigning construction parts to control plans:
- Create a new control plan:
- Select a construction part from the list
- Click the blue button in the lower right corner
- This creates a new control plan for the selected part
- Assign to existing control plan:
- Select a construction part
- Choose an existing control plan from the dropdown
- This adds the part to an already created control plan
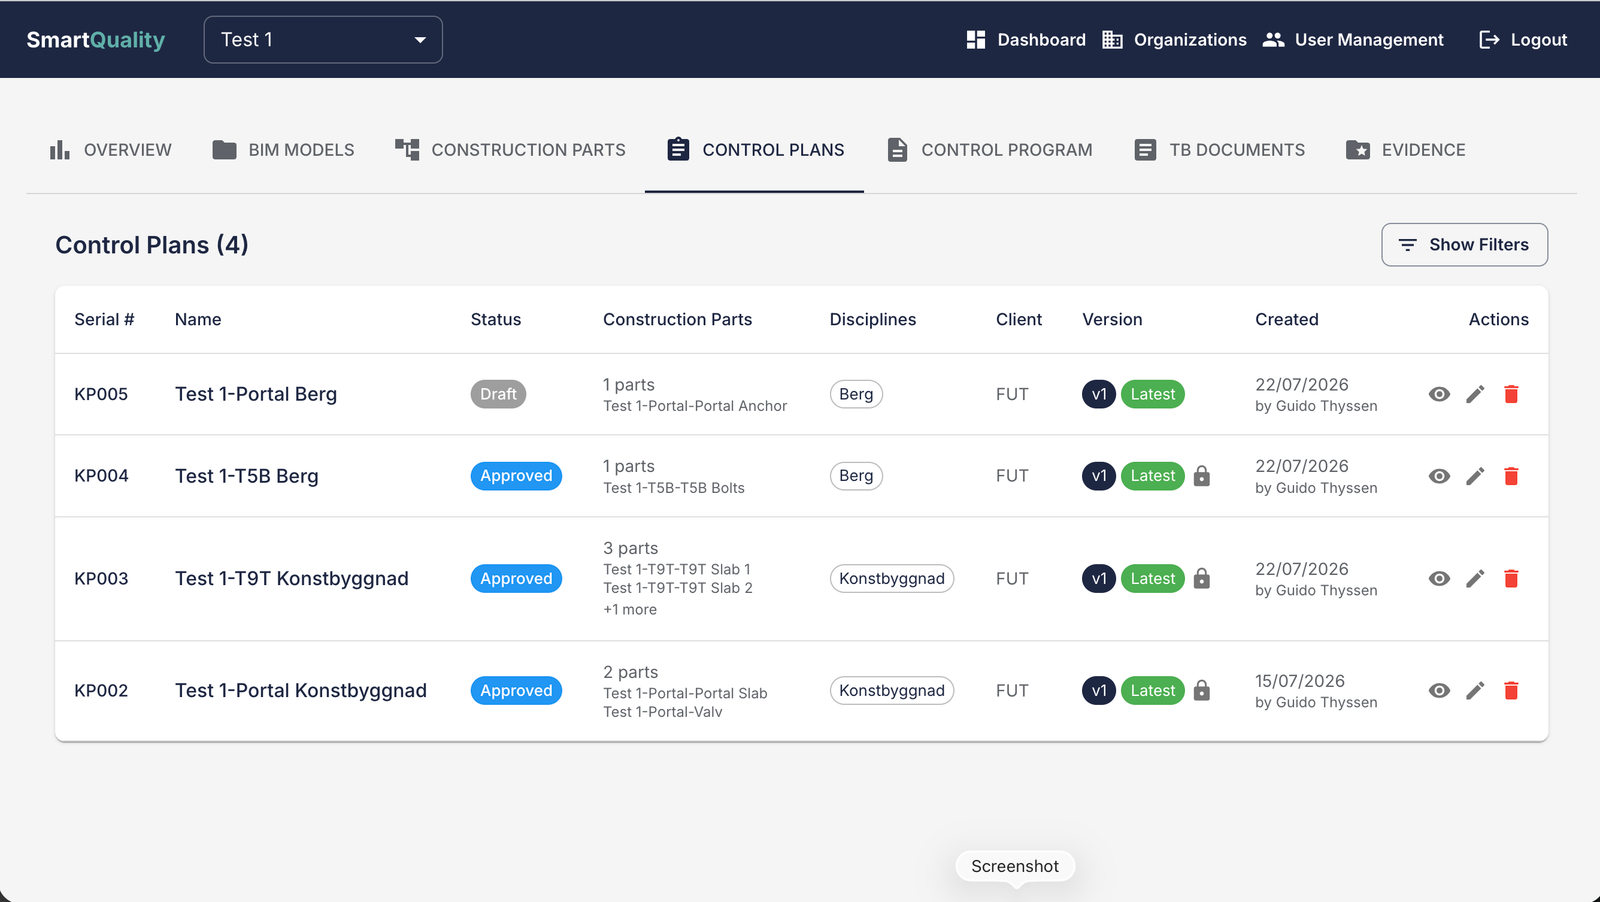
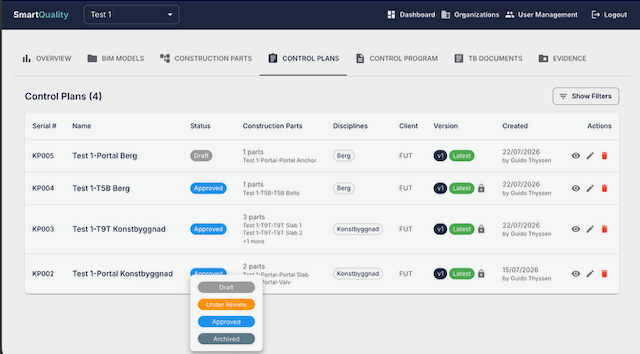
Step 3: View Control Plans
After creating a new control plan or assigning a part to an existing plan, navigate to the
Control Plans tab to see all your project's control plans.
Each control plan shows its associated construction parts and current status. Use the
View button to open and work with a control plan.
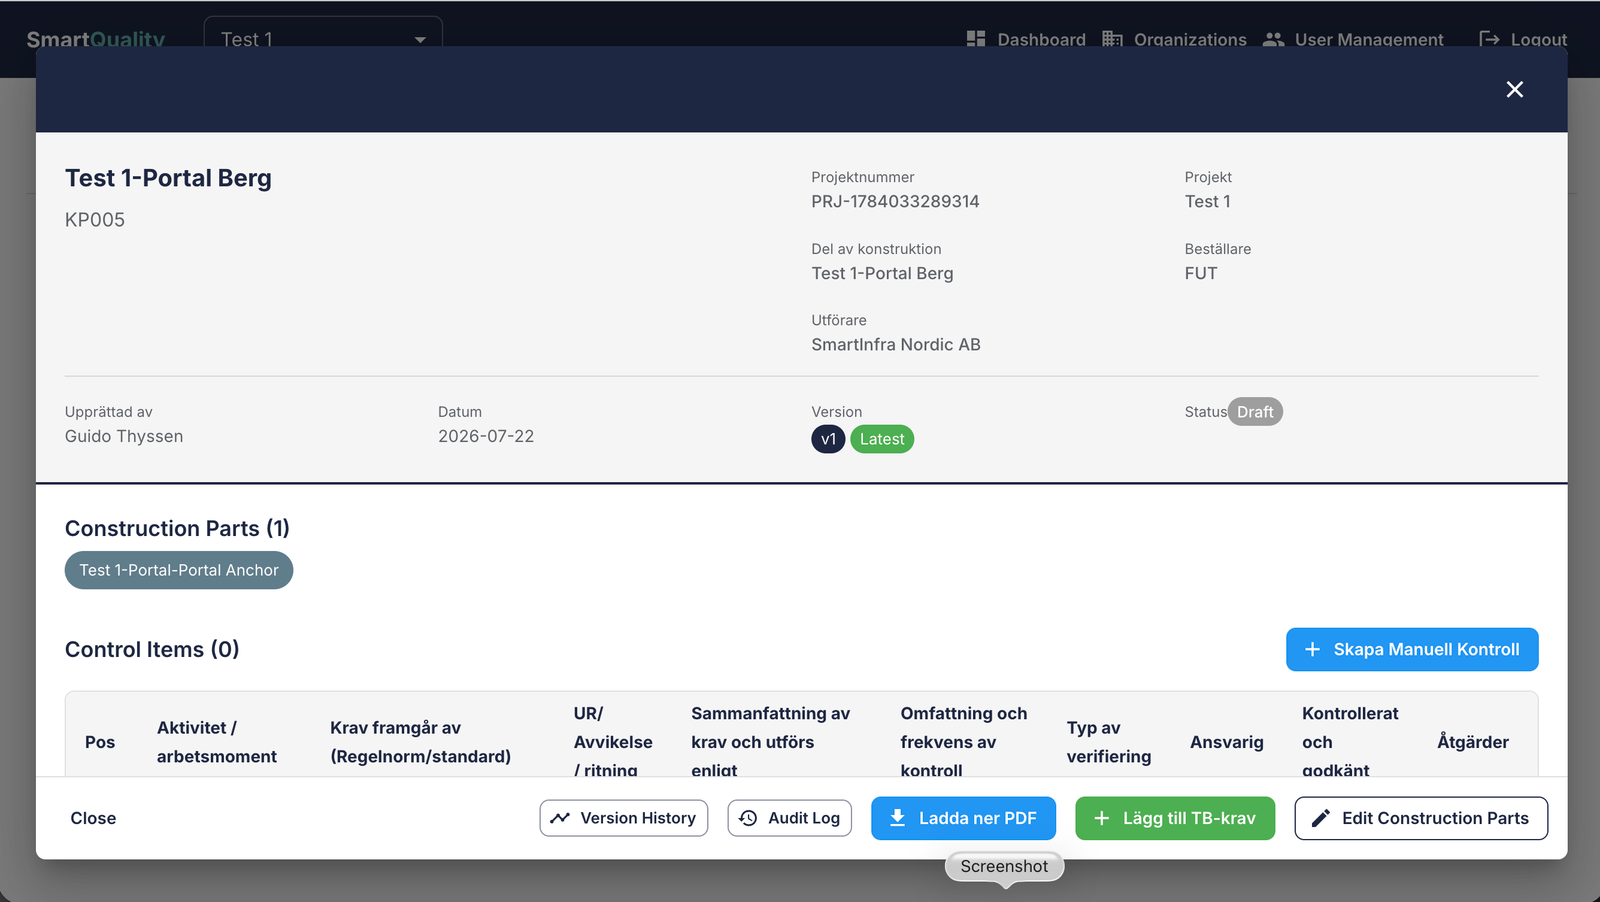
Step 4: Add TB Requirements to Control Plan
Inside a control plan, you can add the quality requirements you extracted and approved
in the TB Documents section. This ensures your control plans are based on verified,
project-specific requirements.
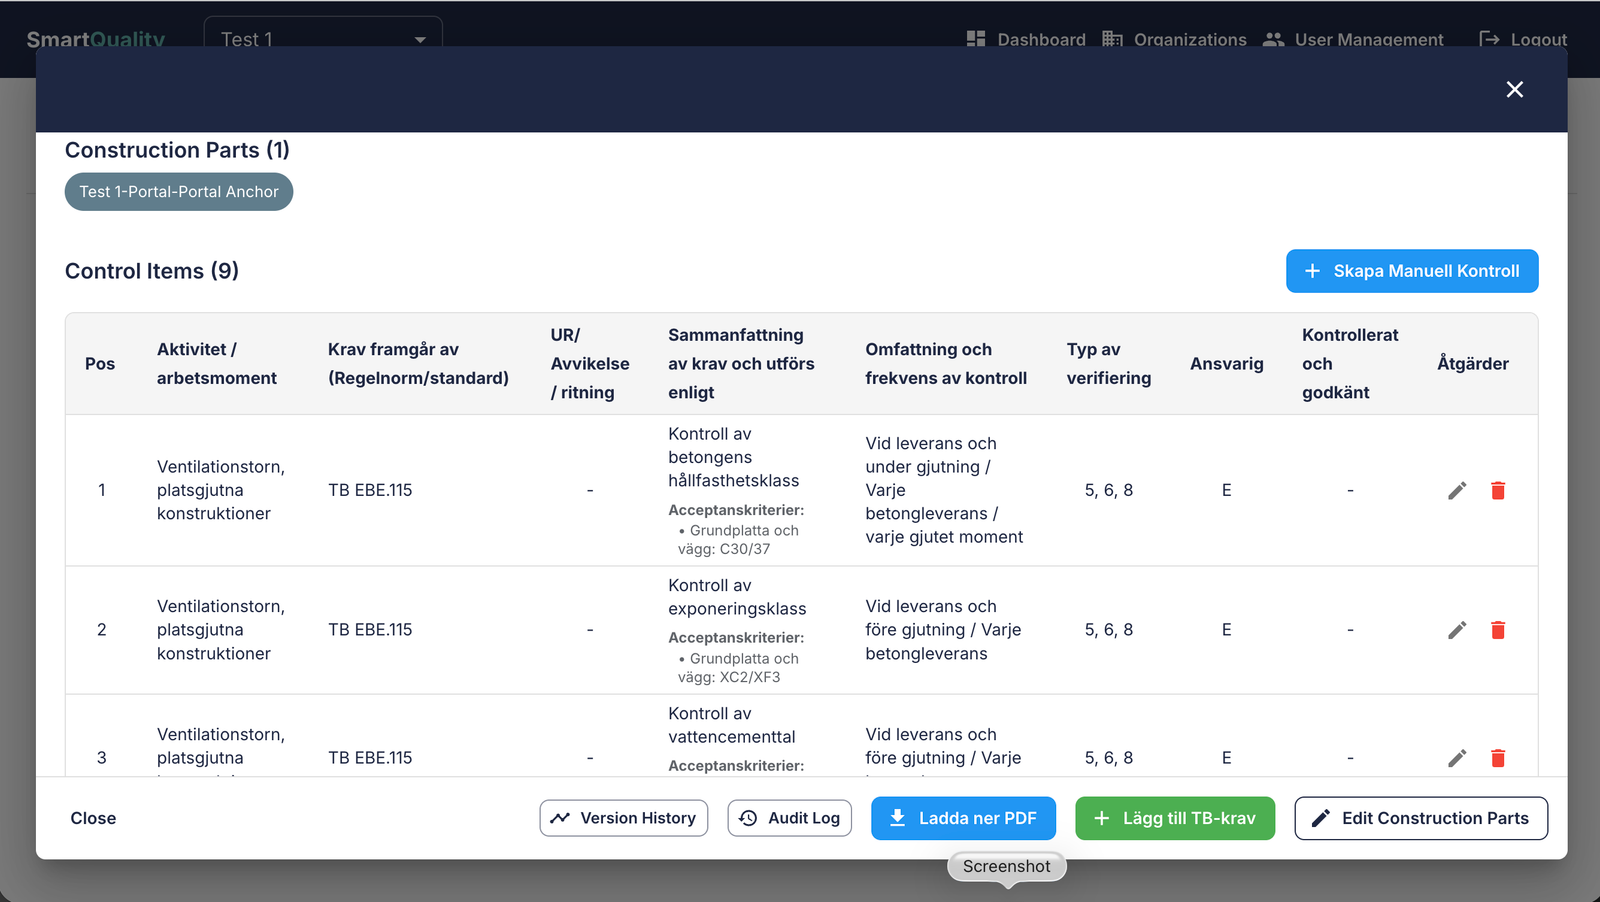
Click "Lägg till TB krav" (Add TB Requirements) to start adding requirements
to this control plan. You can also edit the control plan, view audit trails, and manage other settings.
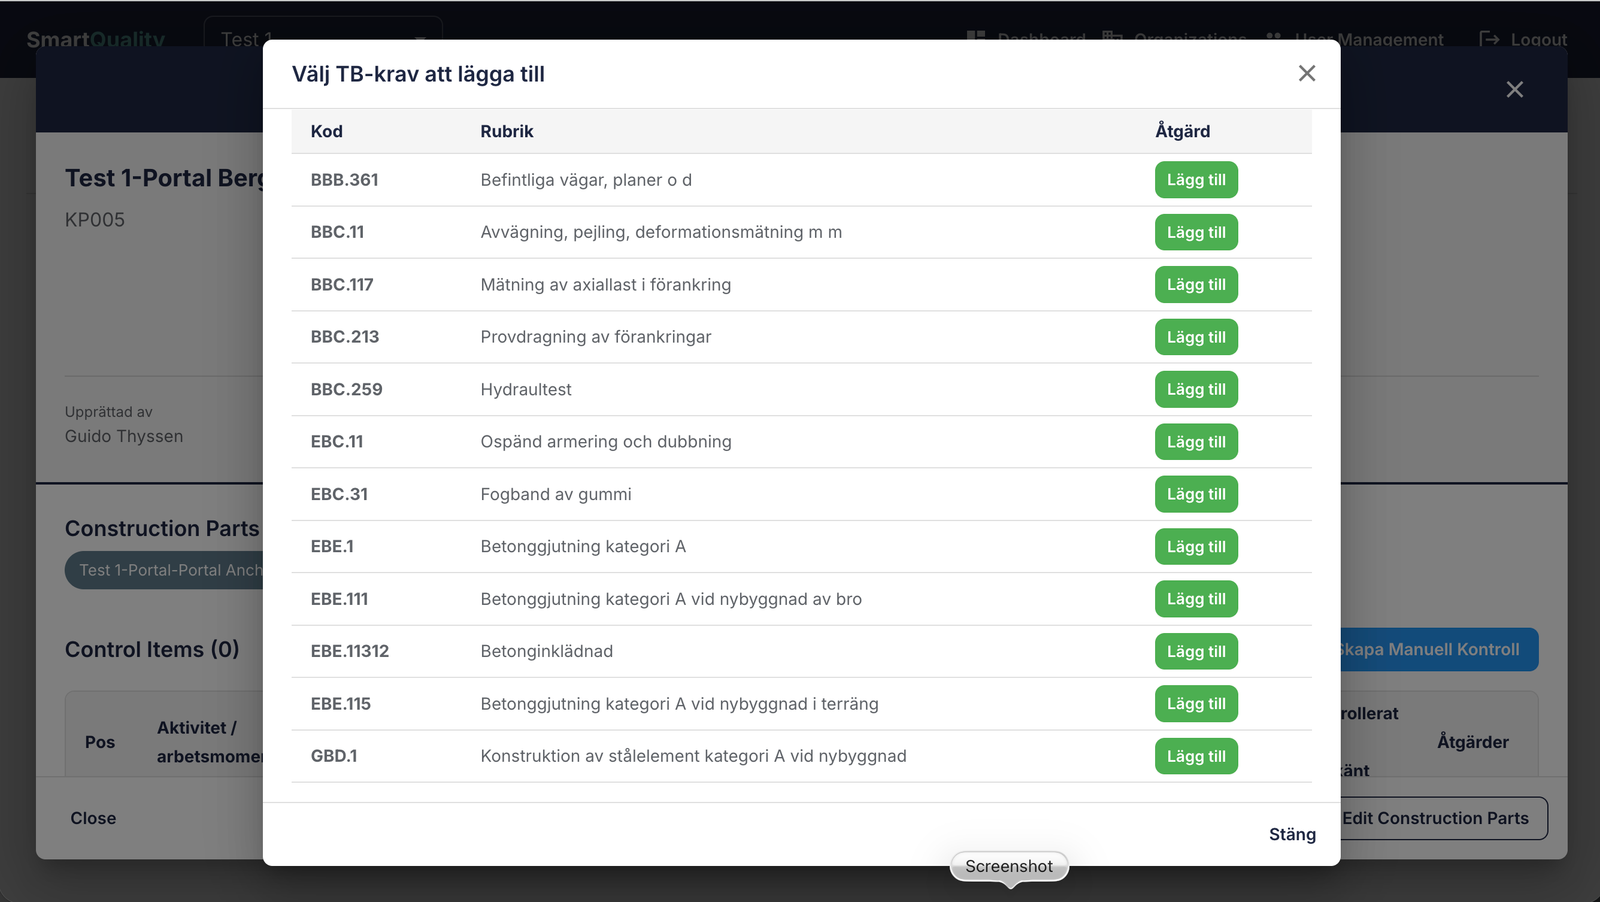
Step 5: Select Requirements from TB Documents
A list of all approved TB codes and requirements appears. These are the requirements you
extracted, reviewed, and approved in the TB Documents workflow.
Select the codes relevant to this control plan. You can choose multiple requirements
that apply to the construction parts assigned to this plan.
Step 6: Requirements Added to Control Plan
The system automatically adds the selected requirements to the control plan, exactly as
they were defined and approved in the TB Documents section.
Each requirement includes the code reference, description, and acceptance criteria. You can
continue adding more requirements or proceed to review and approve the control plan.
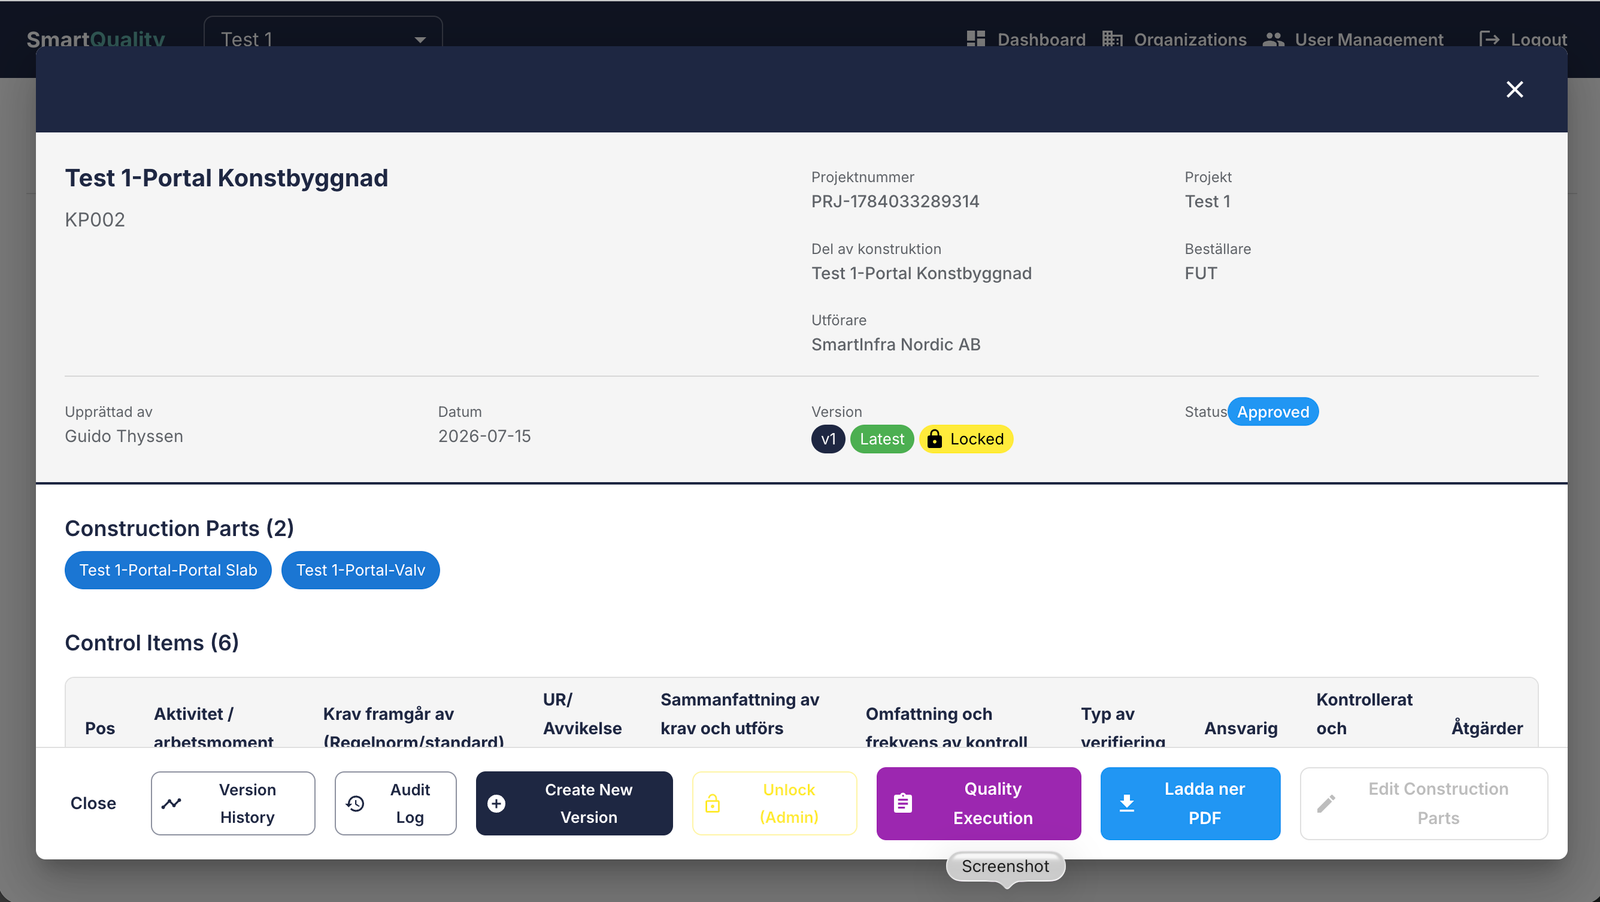
Step 7: Approve Control Plan
Once the control plan is complete and has been reviewed and approved by the client,
you can set the control plan status to Approved.
When a control plan is approved, the system automatically generates all necessary quality
documentation including:
- Quality checklists for each requirement
- Reception control forms
- Evidence collection templates
- Documentation templates specific to the requirements
Note: Approved control plans are locked to maintain audit trail integrity.
Any changes require creating a new version.
Step 8: Access Quality Execution
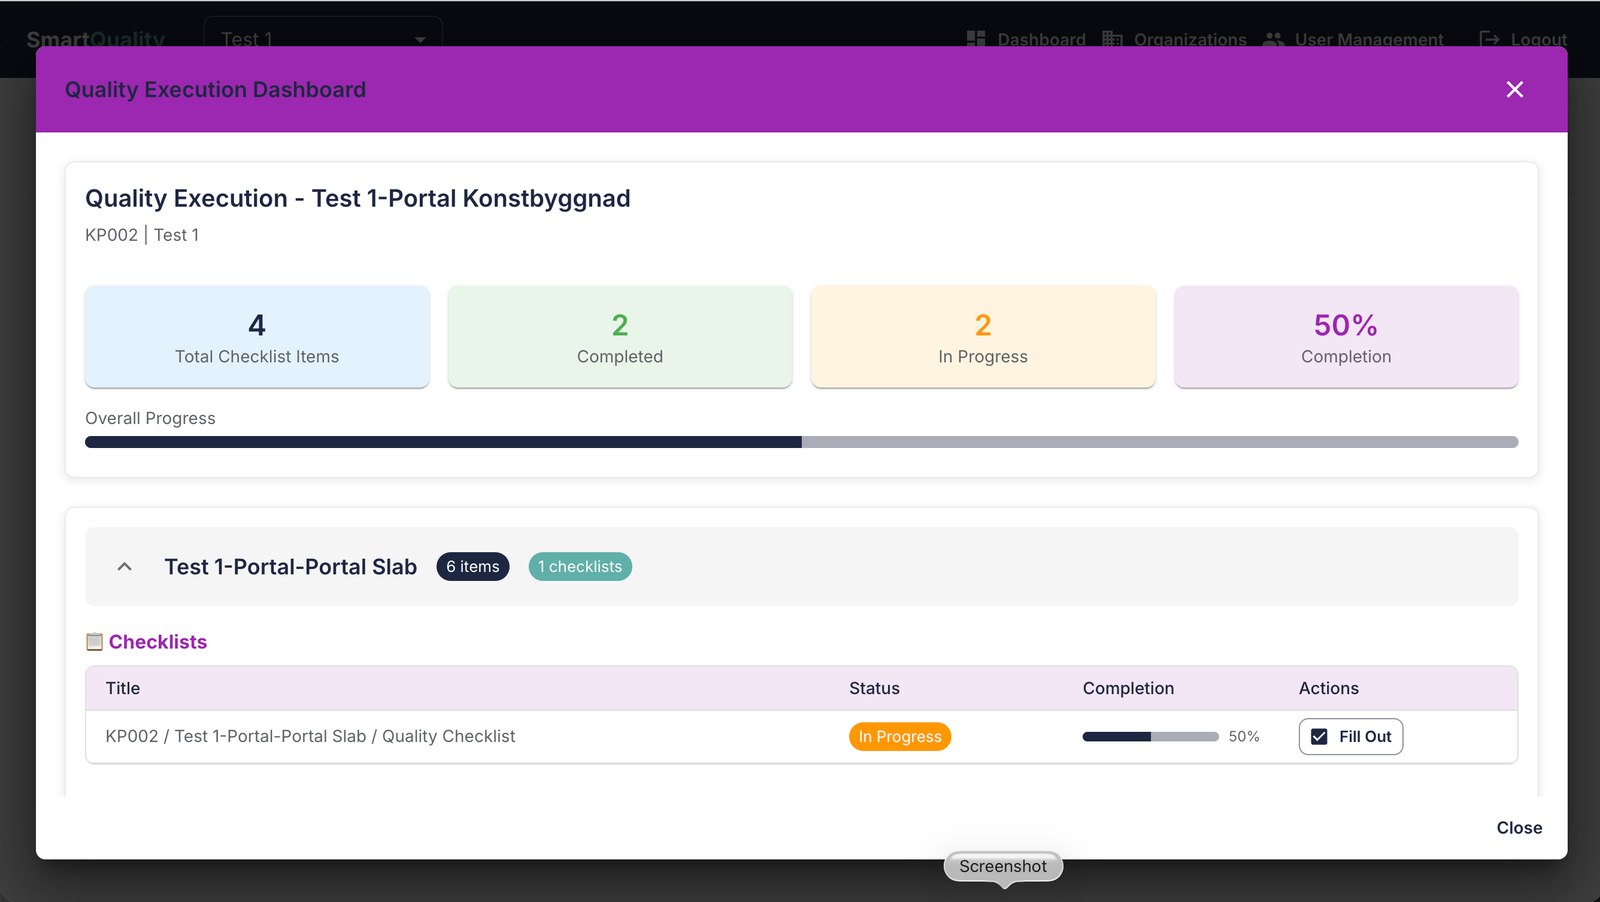
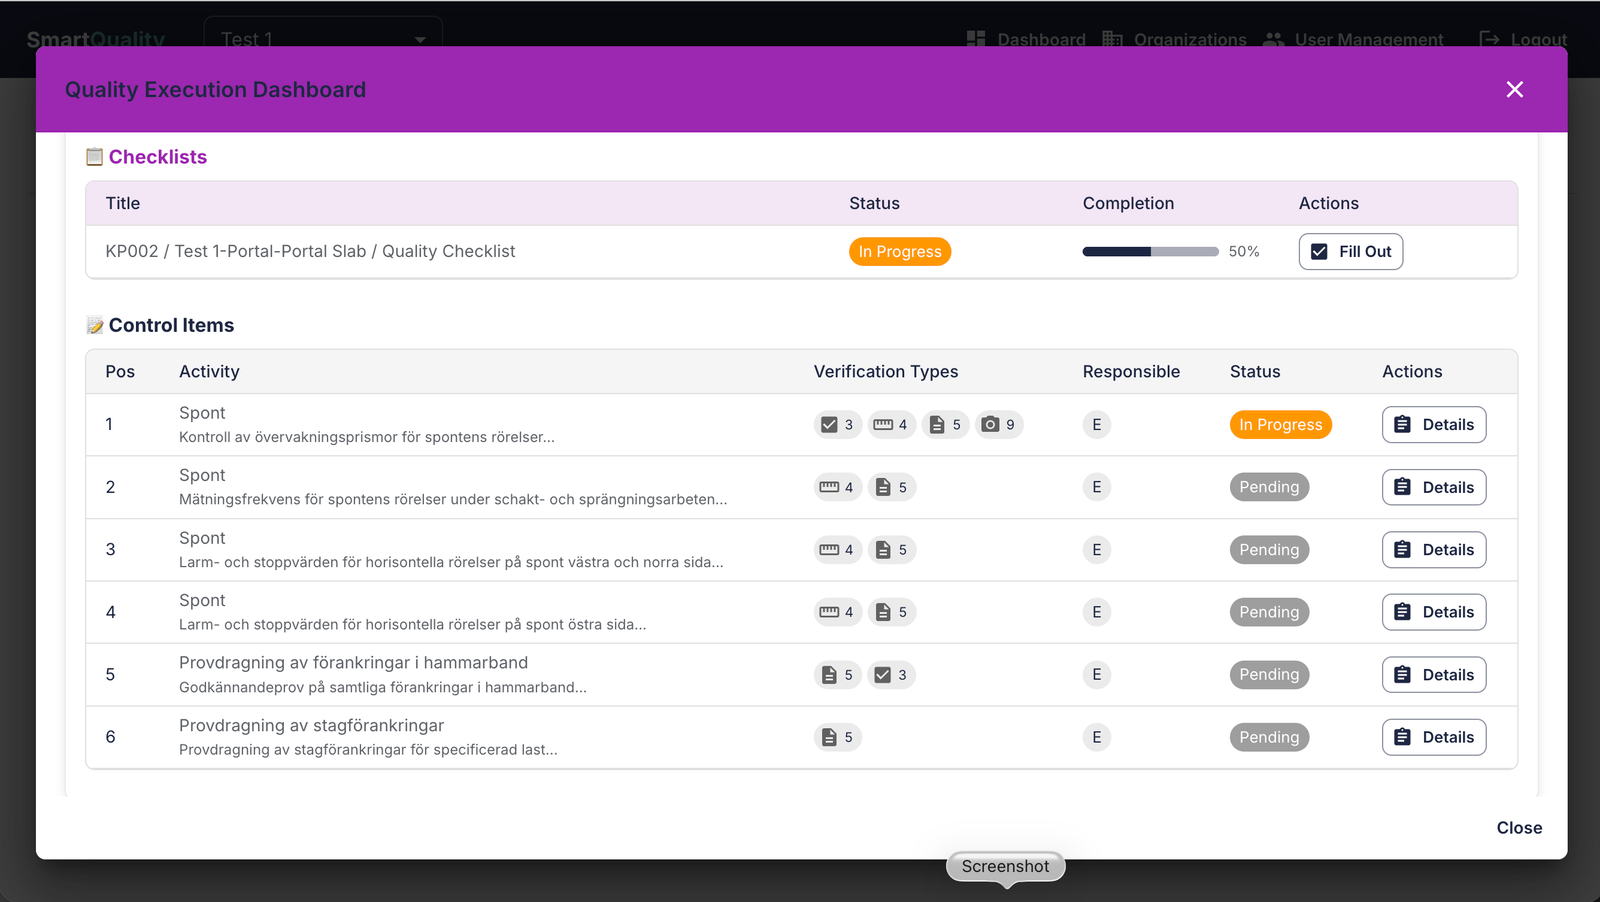
After approval, use the Quality Execution button to access all generated
documentation and begin the quality control work.
The Quality Execution view provides:
- All checklists organized by construction part
- Progress tracking for each control item
- Photo capture and evidence attachment
- Signature collection for approvals
- Real-time status updates
Quality inspectors can access this documentation through the mobile app for on-site work.
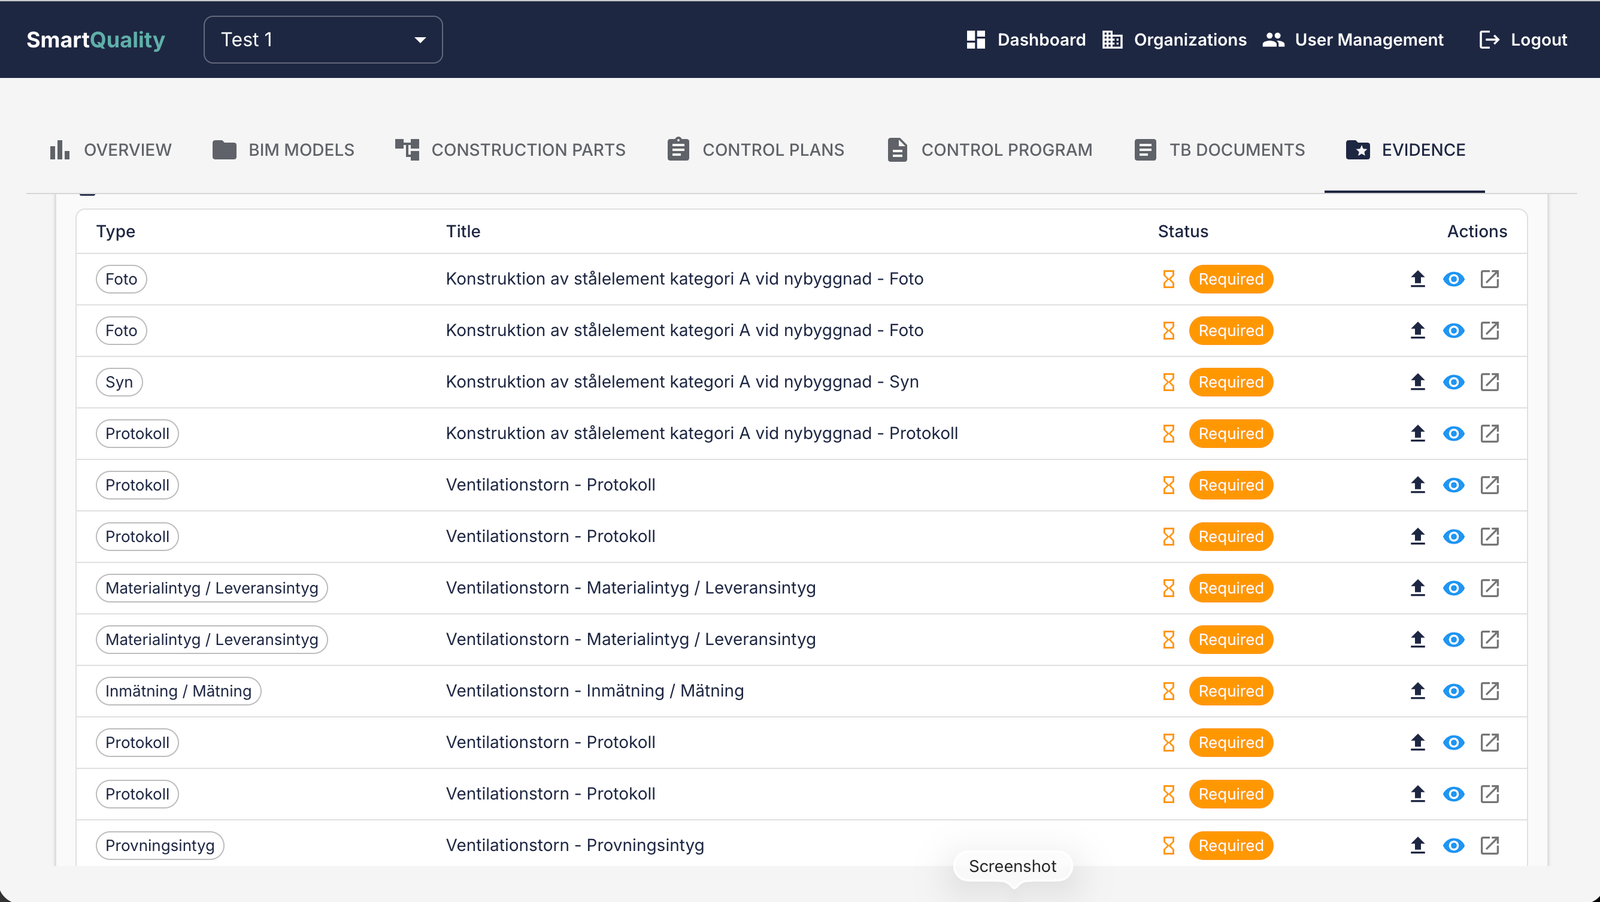
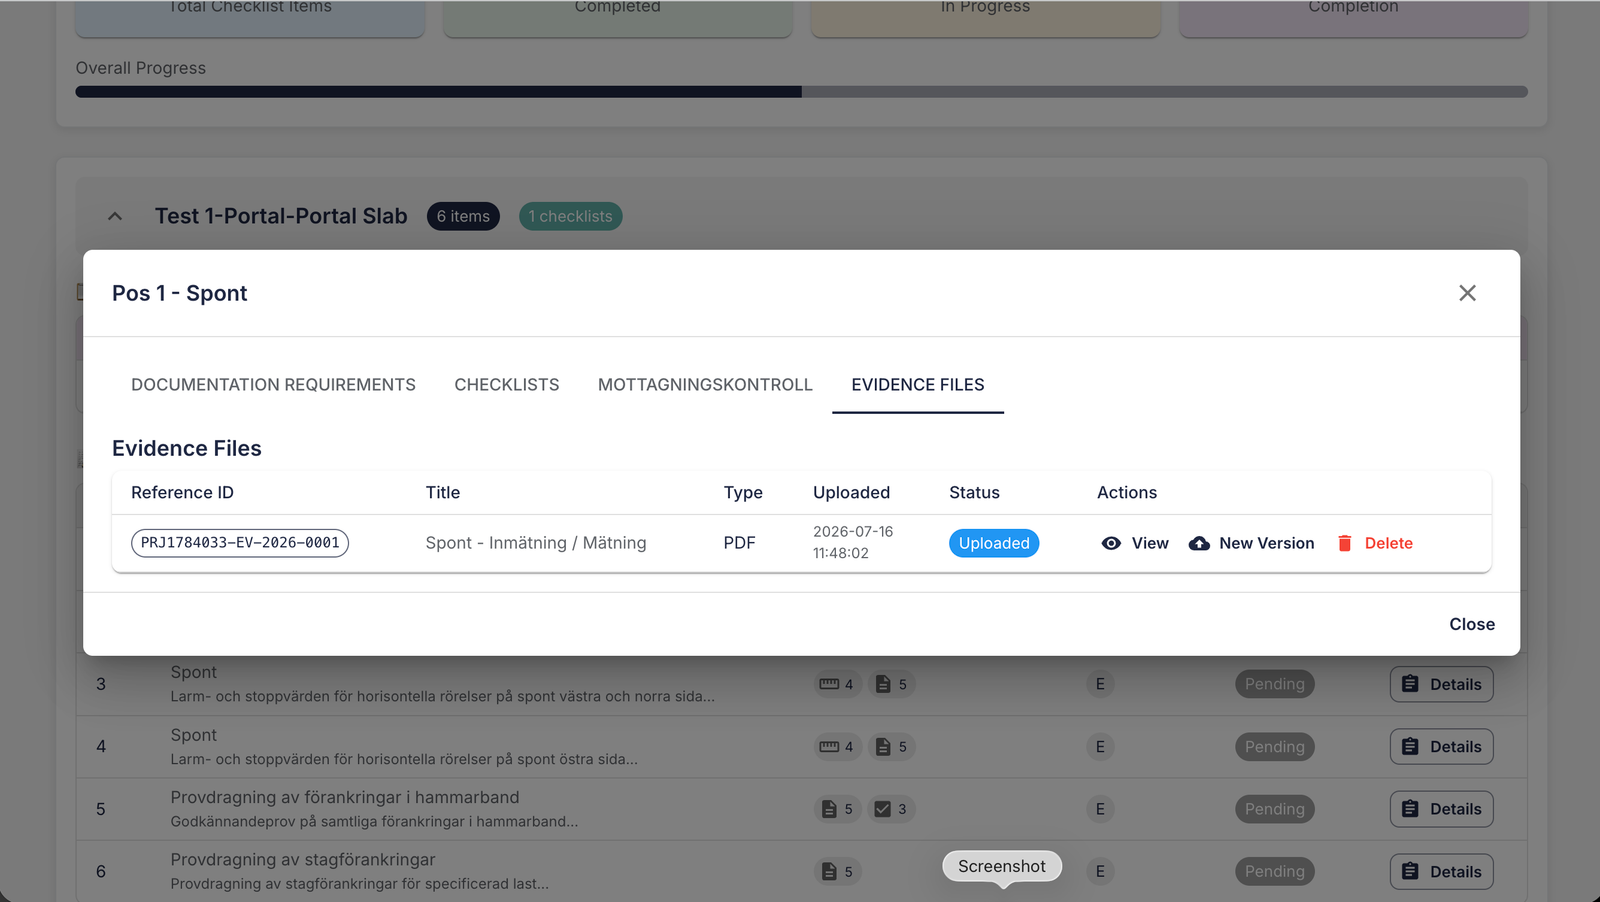
Quality Execution - Evidence Tab
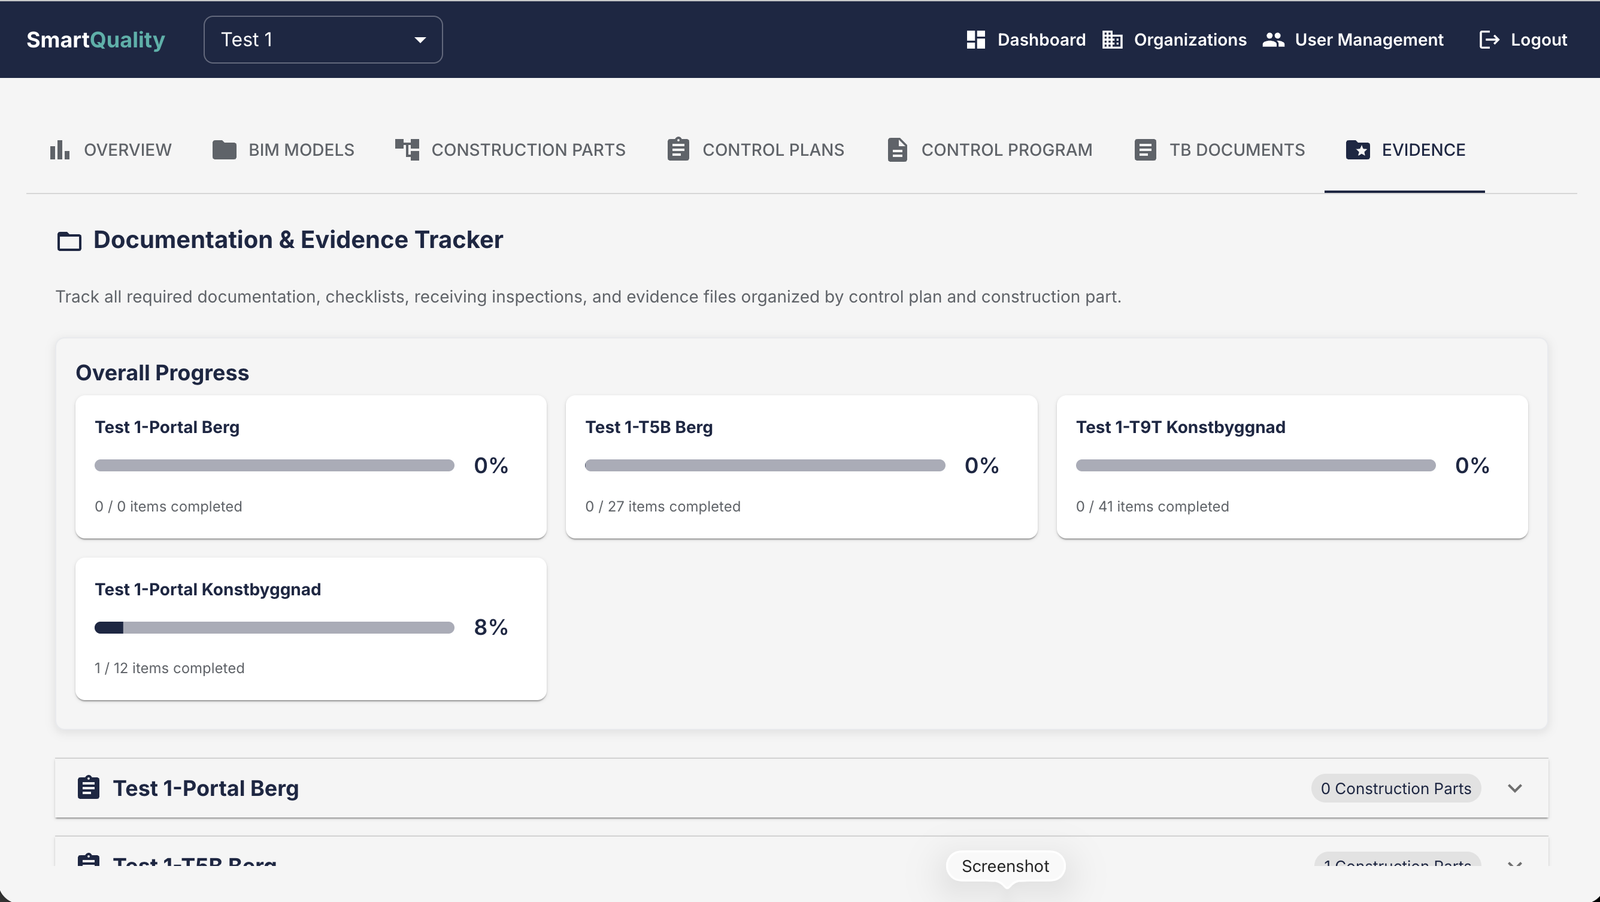
The Evidence tab is automatically created and structured according to your project's established
organization. It provides a comprehensive overview of quality work status, all documentation that
needs to be collected, and direct access to quality execution with the ability to view and edit documents.
Evidence Overview
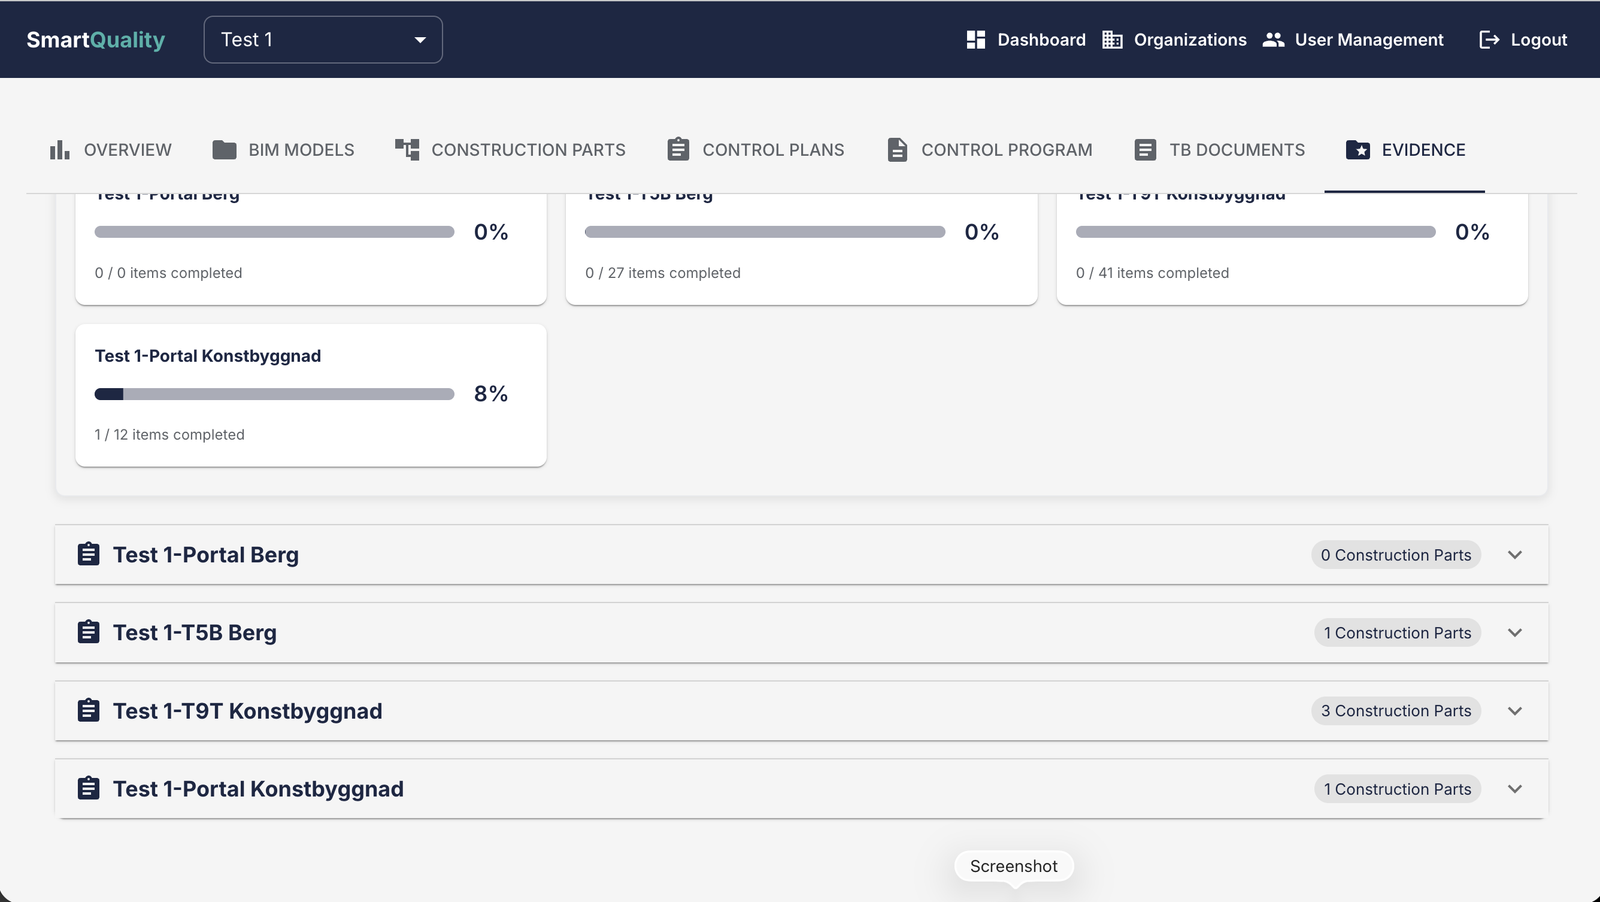
The Evidence tab displays your project's quality documentation structure, organized by
construction parts and units. The view provides:
- Status Overview: Visual indicators showing completion status of quality work
- Documentation Tracking: All required documents for each construction part
- Access to Execution: Direct links to checklists and quality controls
- Document Management: View, edit, and upload capabilities
The hierarchical structure matches your BIM folder organization, ensuring consistent
traceability from model to documentation.
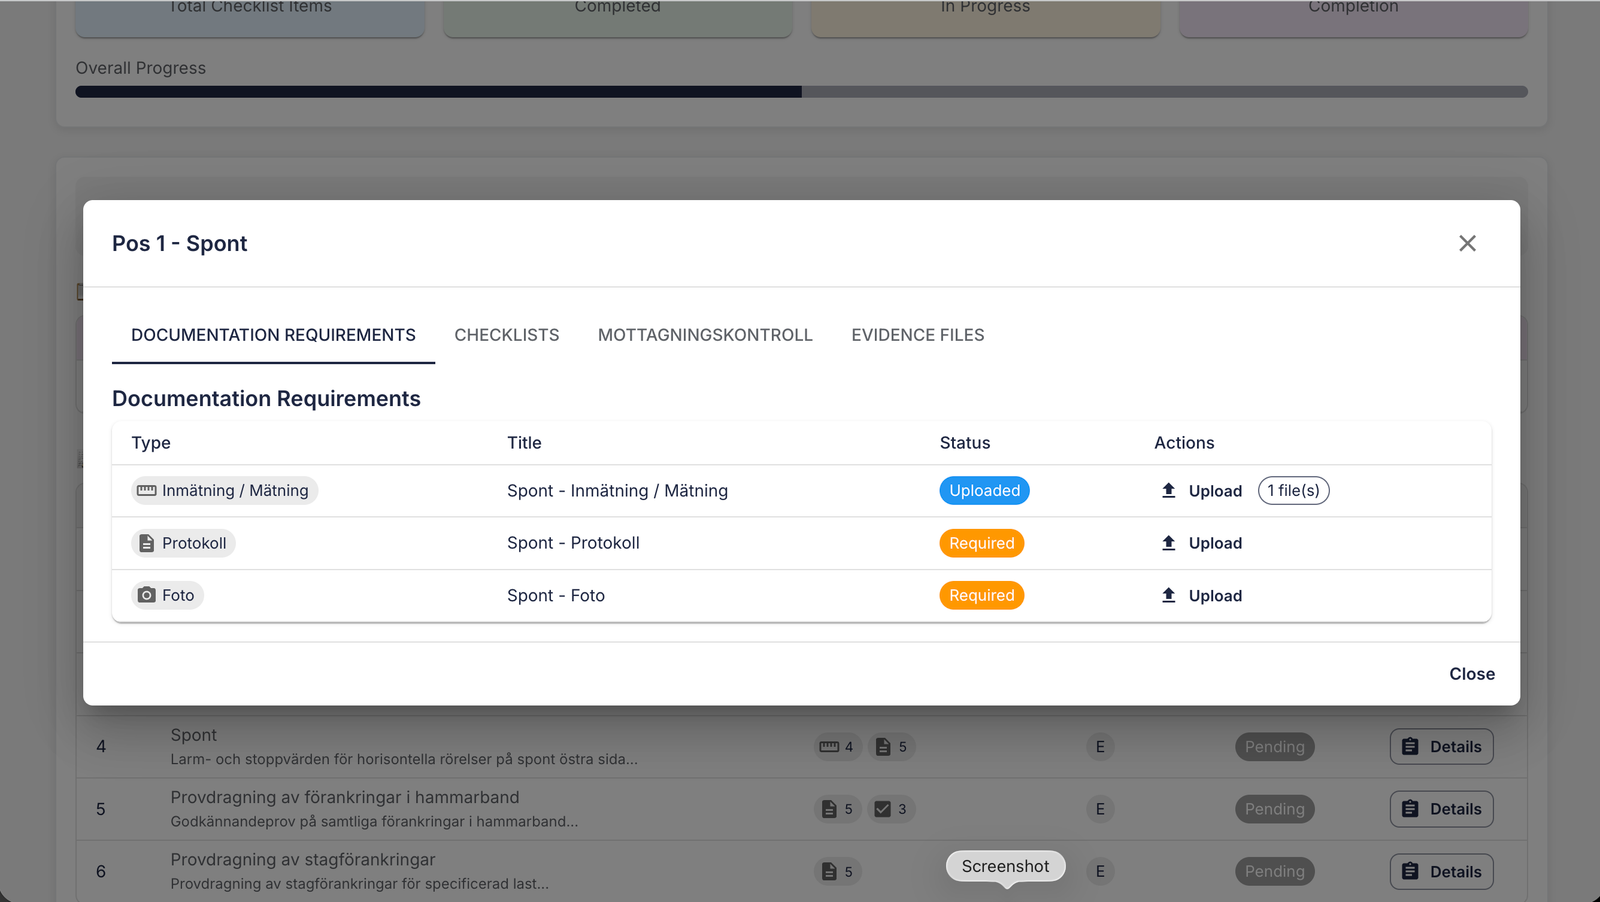
Construction Part Details
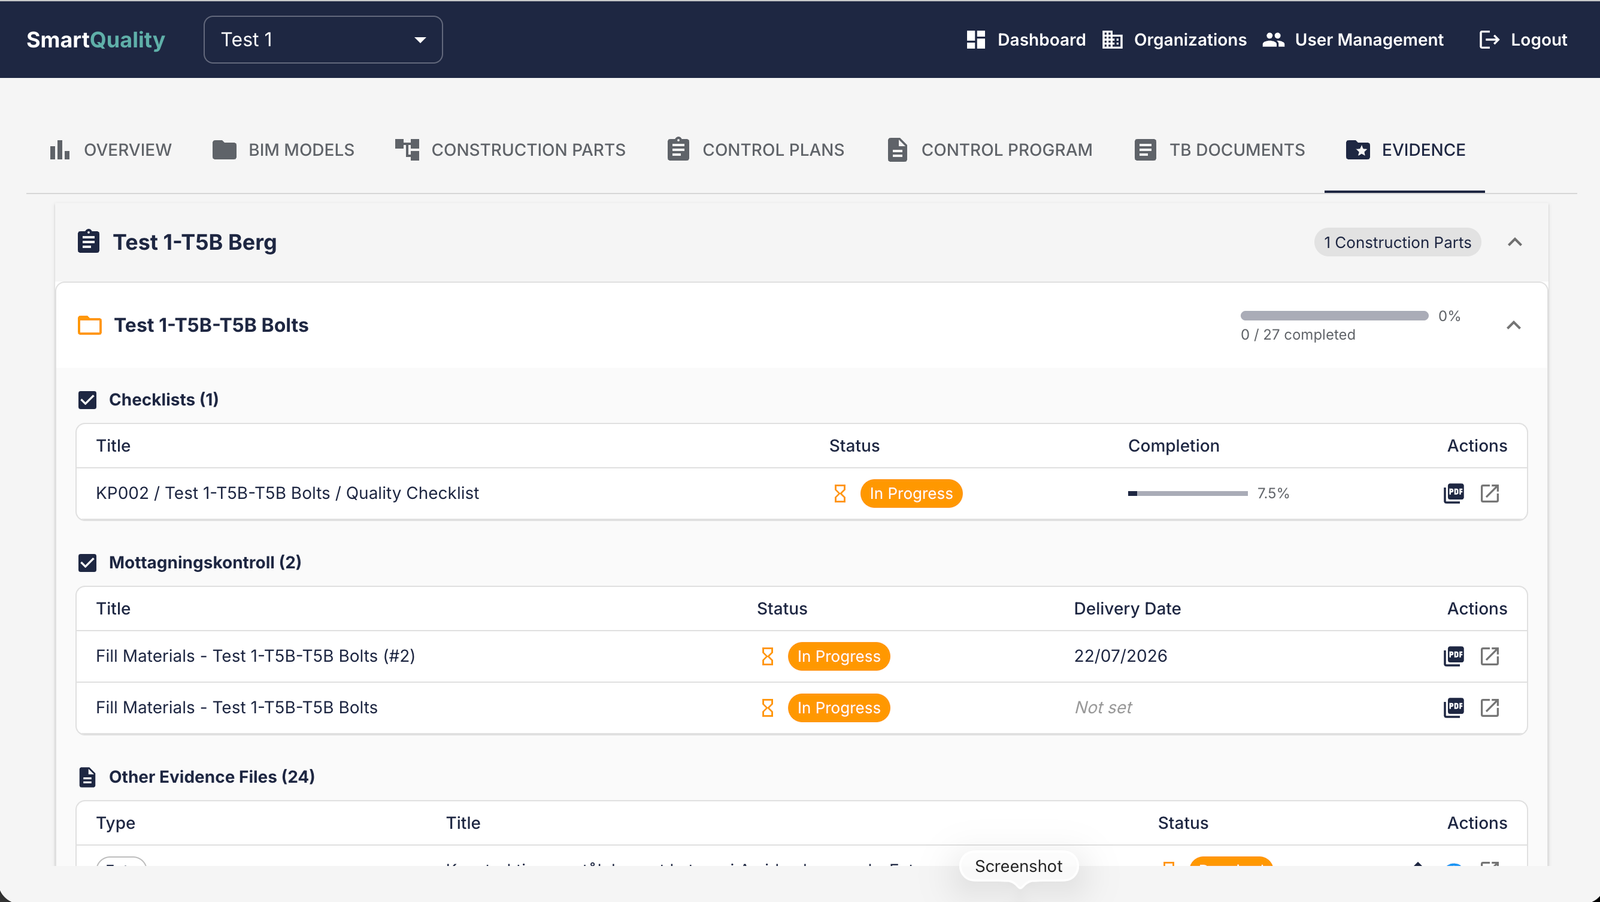
When you expand a construction part folder, you can see detailed information about all
quality documentation associated with that part:
- Required evidence files and their current status
- Linked control plans and requirements
- Checklists ready for completion
- Supporting documents and photos
- Signatures and approvals
Each folder shows progress indicators and provides immediate access to all documentation
needed for that specific construction unit.
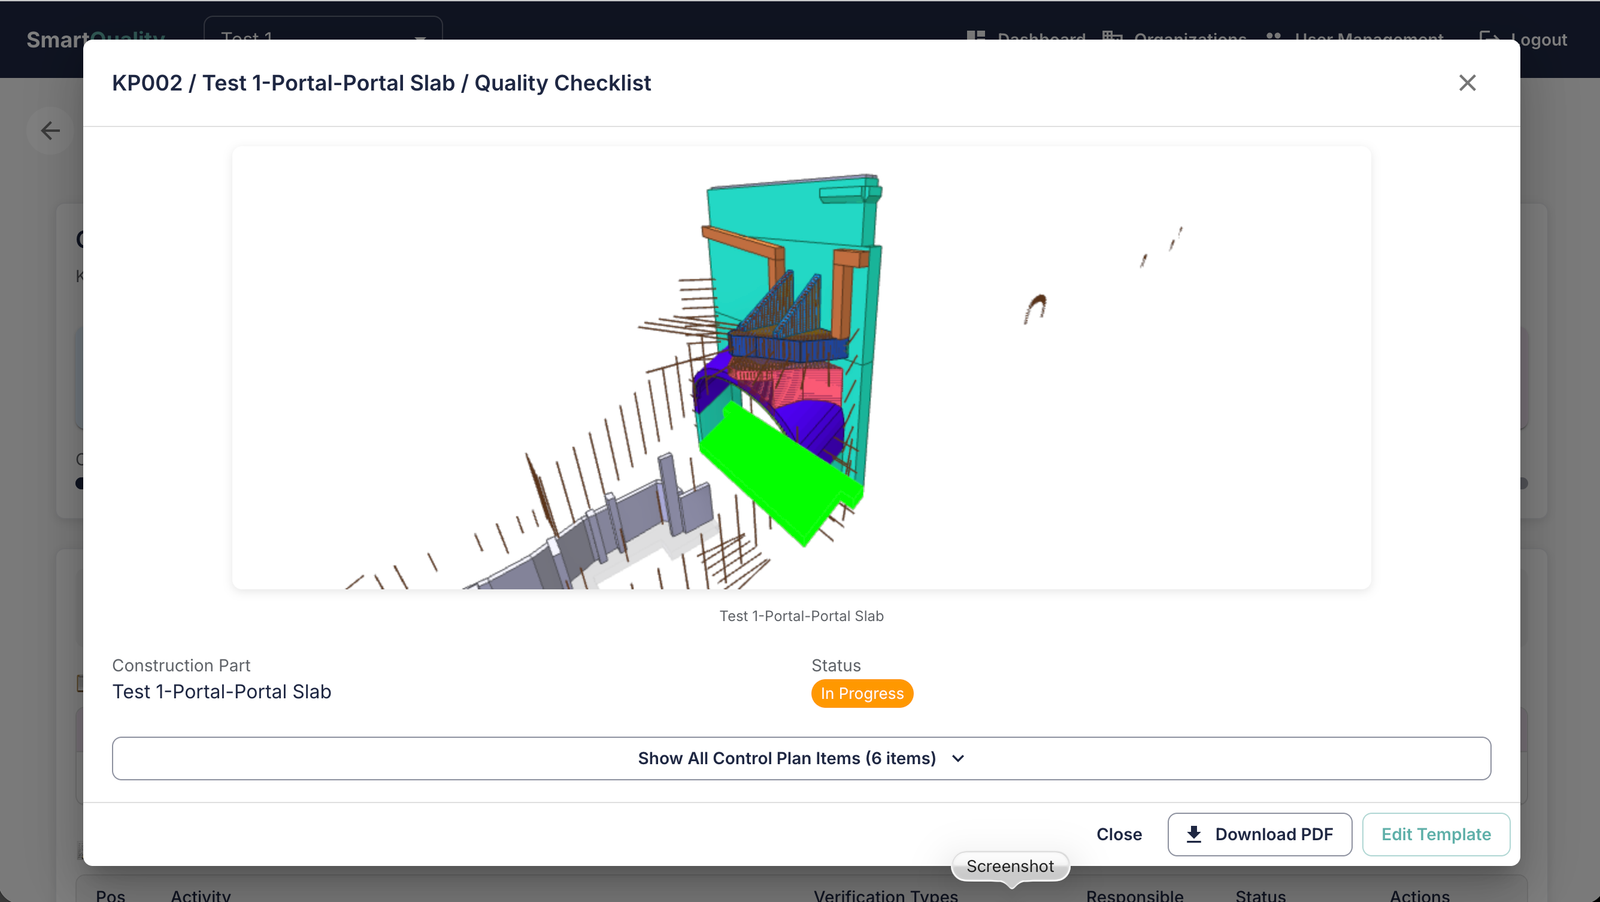
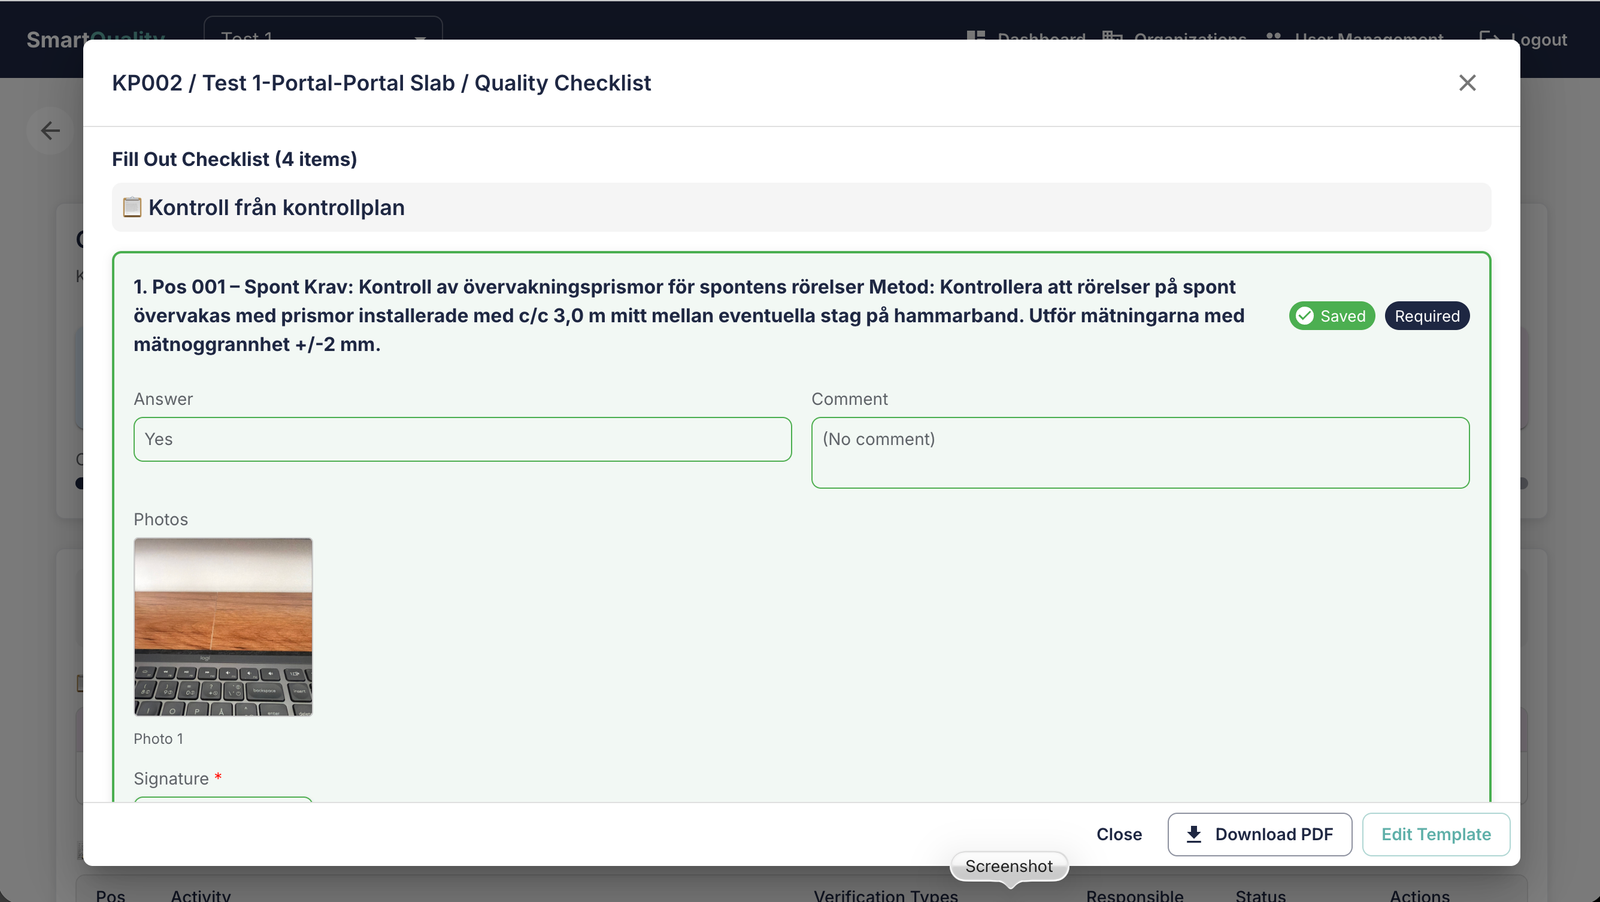
Accessing and Completing Checklists
From the Evidence tab, you can directly access checklists for each construction part.
Each checklist includes:
- Automatic Screenshots: Every checklist displays a screen capture of the
construction part from the BIM model, automatically taken when the part or unit was created
- Quality Requirements: All control items from the approved control plan
- Evidence Fields: Spaces for photos, measurements, notes, and signatures
- Status Tracking: Progress indicators showing completion status
The visual reference from the model helps inspectors quickly identify the correct
construction part during on-site quality checks.
💡 Tip: The mobile app allows offline checklist completion,
syncing automatically when connection is restored.
Document Management
The Evidence tab provides complete document management capabilities for each construction unit.
Documentation is automatically linked to the control plan and the defined evidence requirements.
From the Evidence tab you can:
- View Documents: Open and review all uploaded documentation
- Edit Documents: Make changes to existing files when needed
- Delete Documents: Remove outdated or incorrect files
- Upload Documents: Add new evidence files directly from this view
All documents are organized according to the evidence types defined in your control plans,
ensuring that all required documentation is collected and properly filed for each construction unit.
Mobile App Usage
The SmartQuality Field mobile app enables quality inspectors to perform on-site inspections,
complete checklists, capture photos, and work offline with full functionality.
Installing the Mobile App
- Download "SmartQuality Field" from App Store (iOS) or Google Play (Android)
- Install the application on your mobile device
Logging In
After completing the signup process described in the Roles/Permissions & Signup Process section,
Quality Inspectors can log in to the mobile app:
- Open the SmartQuality Field app
- Enter your email and password (created during mobile signup)
- Tap "Log In"
- The app will display your assigned projects
Working Offline
The mobile app is designed for offline field work with full functionality without internet connection.
Download Project Data
- Open a project
- Tap "Download for Offline Use"
- Wait for download to complete
Work Offline
- All downloaded controls available offline
- Fill out checklists
- Capture photos (stored locally)
- Add signatures and notes
Sync When Connected
- Connect to WiFi or mobile data
- Tap "Sync" button
- All offline changes upload to server
- Status updates in real-time
Capturing Photos
- Tap on a checklist item requiring photo
- Tap "Take Photo"
- Allow camera access if prompted
- Frame your shot
- Tap capture button
- Review photo and tap "Use Photo" to attach
Best Practices for Photos
- Ensure adequate lighting
- Include reference objects for scale
- Capture multiple angles if needed
- Photos are automatically compressed for storage efficiency
Troubleshooting & FAQ
Common Issues
Problem: Offline changes not uploading
Solutions:
- Check internet connection
- Verify you're logged in
- Try manual sync by pulling down to refresh
- Force close and reopen the app
- Check storage space on device
Problem: 3D viewer shows error or blank screen
Solutions:
- Verify file format is supported (IFC, DWG, NWD, DXF, RVT)
- Check file size (very large files may time out)
- Try refreshing the page
- Try a different browser
Frequently Asked Questions
Q: Can I work completely offline?
A: Yes, the mobile app supports full offline functionality. Download your projects, complete work offline, and sync when connected.
Q: Can I edit an approved control plan?
A: No, approved control plans are locked. You must create a new version with revisions. This maintains audit trail integrity.
Q: How many photos can I attach?
A: No limit on photo count, but individual photos are limited to 10MB. Photos are automatically compressed.
Q: Can I delete completed checklists?
A: No, completed checklists cannot be deleted to maintain audit trail. They can be archived or marked as superseded.
Delete Mobile Account (SmartQuality Field)
SmartQuality Field mobile users can permanently delete their account using the dedicated self-service page.
- Open: https://smartinfra-nordic.se/smartquality/delete-account.html
- Enter the email and password used in the SmartQuality Field app
- Submit the request and confirm the permanent deletion
⚠️ Important: This action is permanent and cannot be undone. Your login access and personal account data are removed. Submitted quality records are retained in project records in anonymised form.
Support & Contact
When Reporting Issues, Include:
- Description of the problem
- Steps to reproduce
- Screenshots or screen recording
- Browser/device information
- Project ID (if applicable)
Vad är SmartUR?
⚠️ Policy för Dokumentanvändning
Användaransvar:
- Användare är ansvariga för att säkerställa att de har laglig rätt att ladda upp och bearbeta dokument inom SmartInfra
- Du får endast ladda upp dokument som du har laglig rätt att använda och dela
- Ladda upp projektspecifika dokument såsom dina egna kontrakt, underrättelser och korrespondens
Standardavtal ingår INTE i plattformen:
- AB04, ABT06 och ABK09 är INTE inkluderade i SmartURai-plattformen
- Dessa standardavtal får INTE laddas upp av användare
- SmartURai analyserar endast dina projektspecifika dokument som kan referera till standardavtal
Dataskydd & Integritet:
- SmartInfra® behandlar kunddokument endast för att tillhandahålla tjänsten inom kundens projektmiljö
- Kunddata används inte för att träna AI-modeller eller förbättra generella maskininlärningssystem
- Dina dokument förblir privata och används endast för din tjänst
Genom att använda plattformen bekräftar du att du följer dessa riktlinjer och respekterar upphovsrättsliga skydd.
SmartUR är en AI-assisterad underrättelseplattform som hjälper bygg- och infrastrukturprojekt att strukturera och analysera projektdokumentation och kommunikation. Genom att kontinuerligt lära sig från projektets egna dokument och meddelanden, stödjer SmartUR proaktiv riskhantering och effektivare beslutsfattande.
Kärnvärde: Strukturerad hantering av projektdokumentation med kontinuerlig inlärning från projektkommunikation. Proaktiv riskidentifiering och stöd för juridiskt korrekta underrättelser.
Huvudfördelar
- Strukturerad hantering: Organiserad hantering av projektdokumentation och kommunikation
- Kontinuerlig inlärning: Lär sig löpande från projektets dokument och meddelanden
- Proaktiv riskhantering: Tidig identifiering av risker och avvikelser
- Underrättelsestöd: Hjälp med juridiskt korrekta underrättelser baserat på projektdata
- Dataintegritet: All data behandlas inom projektets kontext, används ej för extern AI-träning
Teknisk Arkitektur
SmartUR är byggd som en multi-tenant plattform med enterprise-grade säkerhet:
- Vektordatabas (Qdrant): Semantisk sökning över projektdokumentation med intelligent indexering
- AI-Processering: OpenAI GPT-5.2 för högkvalitativa analyser med överlägsen prestanda och streaming i realtid
- Datalagring: PostgreSQL för metadata, Redis för multi-layer cachning, Qdrant för vektorembeddings
- Projektspecifik kontext: All analys baseras på projektets egna uppladdade dokument och kommunikation
Snabbstart
Välkommen till SmartUR! Den här guiden hjälper dig att komma igång på mindre än 10 minuter.
1. Skapa ditt konto
- Köp en Prenumeration via smartinfra-nordic.se
- Klicka på aktiveringslänken
- Sätt upp 2FA via Google Authenticator
- Komplettera din Profil vid behov
2. Skapa ditt första projekt
- Klicka på "Nytt Projekt" i huvudmenyn
- Ange projektnamn och beskrivning
- Ladda upp projektdokument
- Vänta på automatisk bearbetning (~1 minut)
- Systemet är nu redo att svara på frågor!
3. Ställ din första fråga
Fråga: "Vad säger AF angående möten?"

Svar: SmartUR analyserar ditt kontrakt och referenser till byggstandarder och ger dig:
✓ Juridisk grund baserad på dina projektdokument
✓ Dina rättigheter och skyldigheter
✓ Nödvändig dokumentation
✓ Deadlines för anmälan
✓ Riskbedömning
Tips: Ju mer specifik din fråga är, desto bättre svar får du. Inkludera datum, belopp och referenser när det är relevant.
Ditt Första Projekt
Ett projekt i SmartUR representerar ett byggprojekt med alla tillhörande dokument och underrättelser.
Dokumentuppladdning
Viktigt: SmartUR stödjer endast digitala PDF-filer med väljarbar text:
- ✅ Stöds: Digitala PDF-filer från Word, InDesign eller native PDF-skapare
- ✅ Dokument: PDF, DOCX, TXT
- ❌ Stöds INTE: Skannade/analoga PDF-filer, bilder eller dokument utan OCR
- Max filstorlek: 50MB per fil
Vad händer efter uppladdning?
- Automatisk Chunking: Dokument delas upp i analysbara segment (typiskt 200-300 chunks)
- Vektorembedding: Innehåll omvandlas till 1536-dimensionella embeddings (OpenAI text-embedding-3-small)
- Qdrant Indexering: Chunks lagras i vektordatabasen för semantisk sökning
- Metadataextraktion: Automatisk extraktion av paragrafnummer och dokumentstruktur
- Processeringstid: 30-60 sekunder per digitalt PDF-dokument
Krav: Endast digitala PDF-filer med väljarbar text. Testa genom att försöka kopiera text i din PDF-läsare - om du kan markera och kopiera text fungerar den. Lösenordsskyddade filer stöds inte.
🤖 AI Juridisk Assistent
Din 24/7 expert på svensk byggnadsrätt - ställ frågor och få omedelbar analys baserad på dina projektdokument.
Möjligheter
- Omedelbara Svar: Ställ vilken fråga som helst om dina byggkontrakt
- Juridisk Analys: Detaljerad analys baserad på dina dokument och svensk byggnadsrätt
- Kontraktstolkning: Förstå komplexa juridiska termer och klausuler
- Prejudikatforskning: Tillgång till relevanta prejudikat och rättsfall
- Riskbedömning: Identifiera potentiella juridiska risker i dina projekt
Hur det fungerar
- Ladda upp dina projektdokument (kontrakt, underrättelser, korrespondens)
- Ställ frågor på naturligt språk (svenska eller engelska)
- Få omedelbara, kontextuella svar med juridiska referenser
- Citera specifika dokumentavsnitt och lagparagrafer
- Exportera analys som professionella PDF-rapporter
Smarta Funktioner
| Funktion |
Beskrivning |
| Streaming-svar |
Se svar genereras i realtid |
| Förloppssp årning |
6-stegs förloppsindikator visar exakt vad AI analyserar |
| Källor & Citeringar |
Varje svar inkluderar referenser till specifika dokument och lagparagrafer |
| Konversationshistorik |
Full chatthistorik sparad per underrättelse/projekt |
| Kontextmedvetenhet |
AI kommer ihåg hela din konversation |
Prestanda: Första frågan: ~60 sekunder (omfattande hämtning). Uppföljningsfrågor (samma ämne): ~10 sekunder (cachade chunks, 10x snabbare). Nya ämnen: ~30 sekunder (smart cache-expansion).
📁 Dokumenthantering
Centraliserad lagring med intelligent bearbetning av alla dina byggdokument.
⚠️ Policy för Dokumentanvändning:
- Användare är ansvariga för att säkerställa att de har laglig rätt att ladda upp och bearbeta dokument inom SmartInfra®
- AB04, ABT06 och ABK09 ingår INTE i plattformen och får INTE laddas upp
- SmartInfra® behandlar kunddokument endast för att tillhandahålla tjänsten inom kundens projektmiljö
- Kunddata används inte för att träna AI-modeller eller förbättra generella maskininlärningssystem
Funktioner
- Dra-och-släpp uppladdning: Enkelt gränssnitt för dokumentuppladdning
- Flera format: Stöd för PDF, DOCX, TXT med mera
- Automatisk bearbetning: Dokument indexeras och analyseras automatiskt
- Smart sökning: Semantisk sökning hittar relevant innehåll, inte bara nyckelord
- Versionskontroll: Spåra dokumentändringar och uppdateringar
Dokumentintelligens
När du laddar upp ett dokument händer följande automatiskt:
- Automatisk Chunking: Dokument delas upp i analysbara segment
- Semantisk Indexering: Innehåll indexeras för snabb AI-hämtning
- Metadataextraktion: Automatisk extraktion av datum, parter och nyckeltermer
- Fulltextsökning: Hitta vilket innehåll som helst i alla dokument
- Direkt PDF-sökning: Sök direkt i PDF-innehåll
📋 Underrättelsehantering
ChatGPT-inspirerat gränssnitt för hantering av byggunderrättelser med omedelbar AI-analys.
Huvudfunktioner
- Modernt chattgränssnitt: Ren, intuitiv design inspirerad av ChatGPT
- Snabb skapande: Snabb inlämning av underrättelse med projektlänkning
- Omedelbar AI-analys: Automatisk juridisk analys när underrättelse skapas
- Statusspårning: Övervaka status (Draft, In Progress, Representative, Lawyer, Closed won, Closed Lost)
Analys-sidopanel
Varje underrättelse får automatiskt en omfattande AI-analys som inkluderar:
- Sammanfattning: Snabb översikt av underrättelsen
- Juridiska referenser: Relevanta referenser till lagar och kontraktsvillkor
- Riskbedömning: Potentiella juridiska och affärsrisker
- Affärsmöjligheter: Strategiska fördelar och möjligheter
- Viktiga frågor: Viktiga punkter att överväga
Export & Delning
- PDF-export: Generera professionella rapporter med full analys
- Utskriftsvänlig: Optimerade layouter för utskrift
📊 Projekthantering
Organisera dina byggprojekt med kraftfull projekthantering och översikt.
Funktioner
- Obegränsat antal projekt: Skapa och hantera flera byggprojekt
- Projekthierarki: Organisera dokument och underrättelser per projekt
- Projektöversikt: Dashboard med nyckeltal och status
- Aktivitetstidslinje: Spåra alla projektaktiviteter och ändringar
🧠 Avancerat Minnessystem
Multi-layer Redis-cachning och Qdrant vektordatabas för optimerad prestanda och intelligent kontexthantering.
Vektordatabas (Qdrant)
- Semantisk Sökning: Hittar konceptuellt liknande innehåll, inte bara nyckelordsträffar
- 105+ chunks per query: Omfattande kontext för AI-analys
- Embedding Model: OpenAI text-embedding-3-small (1536 dimensioner)
- Multi-tenant Isolation: Säker dataseparation mellan organisationer
Redis Multi-Layer Cachning
- Konversationshistorik (1h TTL): Aktiva chattmeddelanden för omedelbar laddning
- Konversationschunks (2h TTL): AI-använda chunks för snabba uppföljningar
- Svarscache: Semantisk cachning för liknande frågor
- Automatisk Cache Expansion: Identifierar ämnesavvikelse och expanderar sökning
Hastighetsförbättringar
| Scenario |
Responstid |
Beskrivning |
| Första frågan |
~60 sekunder |
Omfattande dokumenthämtning + AI-analys |
| Uppföljning (samma ämne) |
~10 sekunder |
Cachade chunks, 10x snabbare |
| Uppföljning (nytt ämne) |
~30 sekunder |
Smart cache-expansion |
| Qdrant Hämtning |
100-300ms |
Semantisk sökning |
Smart Chunk Cachning: Endast chunks som AI faktiskt använder cachas (~20-50 vs 560 chunks), vilket ger 10x snabbare uppföljningar. Ämnesavvikelse detekteras automatiskt för att expandera cachen vid behov.
🔍 Sök & Upptäck
Hitta det du behöver omedelbart med avancerad sökning och upptäcktsfunktioner.
Söktyper
- Semantisk sökning: AI förstår betydelse, inte bara nyckelord
- Fulltextsökning: Traditionell nyckelordssökning över allt innehåll
- PDF-innehållssökning: Direkt sökning i PDF-dokument
- Filtrerad sökning: Filtrera efter projekt, dokumenttyp, etc.
- Boolesk sökning: Avancerade OCH/ELLER/INTE-operatorer
Upptäcktsfunktioner
- Relaterat innehåll: AI föreslår relaterade dokument och underrättelser
- Smarta rekommendationer: Få relevant innehåll automatiskt
- Senaste aktivitet: Snabb åtkomst till senaste arbetet
📄 PDF Export & Rapportering
Professionella rapporter på sekunder med fullständig analys.
Exportmöjligheter
- Underrättelserapporter: Omfattande underrättelsanalys
- Projektrapporter: Fullständiga projektsammanfattningar med alla underrättelser
- Konversationsexporter: Kompletta chatthistoriker
Rapportinnehåll
- Header-information: Projekt, datum, status, typ
- Full analys: Alla AI-analysavsnitt inkluderade
- Källciteringar: Referenser till dokument och lagparagrafer
- Konversationshistorik: Komplett chattutskrift
- Professionell layout: A4-format med korrekt styling
Enkelt: Ett klick för att generera PDF, automatisk intelligent filnamngivning med datum, och möjlighet att skicka rapporter direkt från plattformen.
👥 Användarhantering & Åtkomstkontroll
Enterprise-säkerhet och administration för ditt team.
Användarfunktioner
- Säker autentisering: JWT-baserad med bcrypt-lösenordshashning
- Språkstöd: English platform with support for 10 languages
Säkerhet
- Datakryptering: All känslig data krypterad i vila och transit
- Sessionshantering: Automatisk timeout och token-utgång
- Revisionsloggar: Komplett aktivitetsspårning för efterlevnad
- Tvåfaktorsautentisering: Valfri 2FA för förbättrad säkerhet
🎓 Bästa Praxis
Få ut det mesta av SmartUR med dessa beprövade tips och tekniker.
Ställa Bra Frågor till AI
✅ Goda exempel:
"Vad säger kontraktet om rätt till tidsförlängning vid sen leverans av materiel?"

"Enligt vårt kontrakt från 2023-01-15, har vi rätt att kräva skadestånd för förseningar?"

"Kan du analysera punkt 5.3 i kontraktet och förklara vad det betyder i praktiken?"

"Vilken dokumentation behöver vi för att göra en ÄTA-begäran enligt kontraktet?"
❌ Undvik vaga frågor:
"tidsförlängning?"
"skadestånd?"
"vad händer?"
"problem"
Dokumentorganisering
- Namnge dokument tydligt: Använd beskrivande namn (t.ex. "AB04_Kontrakt_Projekt_Stockholm_2024.pdf")
- Ladda upp kompletta uppsättningar: Inkludera alla relaterade dokument
- Uppdatera regelbundet: Ladda upp ändringar och uppdateringar omedelbart
- Ren data: Ta bort dubbletter eller föråldrade dokument
Underrättelshantering
Skriv Effektiva Underrättelser:
- Var specifik: Inkludera datum, belopp och referenser
- Ge kontext: Förklara situationen tydligt
- Referera dokument: Nämn relevanta kontraktsavsnitt
- Ange din position: Var tydlig med vad du vill ha
- Inkludera deadlines: Specificera svarstidramar
Använda AI-analys:
- Läs sammanfattning först: Få snabb översikt
- Kontrollera juridiska referenser: Verifiera tillämpliga lagavsnitt
- Bedöm risker: Ta identifierade risker på allvar
- Utforska möjligheter: Leta efter strategiska fördelar
- Ställ uppföljningsfrågor: Fördjupa dig i oklara punkter
📖 Användningsfall
Verkliga exempel på hur SmartUR används i byggprojekt.
Användningsfall 1: Begäran om Tidsförlängning
Scenario: Materialleverans försenad med 3 veckor
- Ladda upp dokument:
- Huvudkontrakt (EK)
- Materialleveransschema
- Leverantörs förseningsmeddelande
- Skapa underrättelse:
- Titel: "Begäran om tidsförlängning - Försenad materialleverans"
- Typ: Begäran
- Beskrivning: Detaljer om försening och påverkan
- Granska AI-analys:
- Juridisk grund för tidsförlängning
- Nödvändig dokumentation
- Anmälningsdeadlines
- Risk att inte kräva korrekt
- Ställ uppföljningsfrågor:
- "Hur många dagars förlängning kan vi kräva?"
- "Vilken dokumentation behöver vi?"
- "Vad händer om leverantören bestrider?"
- Exportera rapport:
- Generera PDF med full analys
- Skicka till kund/entreprenör
- Arkivera för projektdokumentation
Användningsfall 2: ÄTA-analys
Scenario: Kund begär designändringar mitt i projektet
- Dokumentuppladdning:
- Ändringsbegäran från kund
- Kostnadsuppskattningar
- Fråga AI:
- "Hur hanteras ÄTA enligt AF?"
- "Måste vi acceptera ändringen?"
- "Hur beräknas ersättning för merkostnader?"
- Få vägledning:
- Juridiska krav för ÄTA
- Prissättningsmetod
- Tidspåverkansbedömning
- Förhandlingsstrategier
Användningsfall 3: Felhantering
Scenario: Kund påstår byggfel
- Ladda upp inspektionsrapport:
- Fellista från kund
- Kvalitetssäkringsdokument
- Originalspecifikationer
- AI-analys:
- "Analysera felförteckningen"
- "Vilka fel är berättigade enligt AF?"
- "Vad är våra skyldigheter?"
- Riskbedömning:
- Granska AI-identifierade risker
- Bedöm ansvarsexponering
- Förstå garantiskyldigheter
- Planera åtgärdsstrategi
🔧 Felsökning
Vanliga problem och deras lösningar.
Problem: "AI tar för lång tid att svara"
Lösningar:
- Kontrollera din internetanslutning
- Systemet kan bearbeta stora dokument (endast första gången)
- Uppdatera sidan om den fastnar i >2 minuter
- Cache byggs (händer endast en gång per projekt)
Problem: "Dokument bearbetas inte"
Kontrollera:
- Filformatet stöds (PDF, DOCX, TXT, etc.)
- Filstorleken är under 50MB
- PDF är inte lösenordsskyddad
- Dokumentet innehåller läsbar text (inte skannad bild utan OCR)
Problem: "Kan inte hitta uppladdat dokument"
Lösningar:
- Kontrollera att du är i rätt projekt
- Vänta 2-3 minuter för att bearbetningen ska slutföras
- Uppdatera dokumentlistan
- Kontrollera att dokumentet laddades upp framgångsrikt (grön bekräftelse)
Problem: "AI-svar är inte relevanta"
Förbättra genom att:
- Ge mer kontext i din fråga
- Referera specifika dokument eller avsnitt
- Använda uppföljningsfrågor för att förtydliga
- Säkerställa att alla relevanta dokument är uppladdade
Systemgränser
| Parameter |
Gräns |
| Max filstorlek |
50MB per fil |
| Totalt lagringsutrymme |
Obegränsad |
| Projekt |
Obegränsat |
| Dokument per projekt |
Obegränsat |
| Användare per företag |
1 Användare per licens |
📞 Support & Hjälp
Behöver du hjälp? Vi finns här för dig!
Kontakta Oss
Du kan kontakta vår support via:
Svarstid: Vi strävar efter att svara inom 24 timmar under vardagar.
📝 Release Notes
Håll dig uppdaterad med de senaste förbättringarna och nya funktionerna i SmartURai.
SmartUR v2.0.2
11 februari 2026
🎉 Nya funktioner
Komplett sektionståckning
När du ställer en fråga om en specifik sektion får du nu alla subsektioner automatiskt inkluderade i svaret.
Fungerar för alla dokumenttyper: Oavsett vilken typ av projektdokumentation du laddar upp.
Smartare dokumenthämtning
- Ingen information missas: Sektionsfrågor får obegränsad budget (endast token-begränsad)
- Bättre kvalitet: 5-lagers filtrering säkerställer endast relevanta chunks
- Tväranalys: AI läser alla dina projektdokument och kunskapsbasen tillsammans
- Intelligent prioritering: Dynamisk viktning baserat på frågekontext istället för fasta procentsatser
💡 Vad du kommer att märka
- 📝 Mer omfattande svar på sektionsfrågor
- 🎯 Alla relaterade subsektioner inkluderade automatiskt
- 🚀 Snabbare, mer fokuserade svar
- 📚 Komplett täckning som en riktig jurist
🐛 Buggfixar
- Fixat textpositionsfel som påverkade sektionsdetektering
- Fixat sektionsexpansion för att inkludera alla subsektioner
- Städat upp 56 debug-filer
💡 Pro Tips
Ladda upp dina projektdokument igen för att få mest nytta av förbättrad sektionsdetektering!
För äldre versioner och komplett versionshistorik, se vår nyhetssida
eller kontakta support.
Vad är SmartAudit?
SmartAudit är en omfattande plattform för riskbedömning och revisionshantering inom byggbranschen,
särskilt utformad för svensk bygg- och anläggningsindustri. Systemet kombinerar avancerad AI-driven analys
med traditionella revisionsarbetsflöden för att hjälpa organisationer att genomföra grundliga leverantörsrevisioner,
bedöma arbetsrättslig efterlevnad och hantera risker i byggprojekt.
Kärnvärde: AI-driven företagsforskning med 15+ svenska datakällor, automatisk arbetsmiljöbedömning och realtidsanalys för att säkerställa leverantörsefterlevnad.
Huvudfördelar
- AI-Driven Intelligens: Automatisk företagsforskning från 15+ svenska datakällor
- Arbetsmiljöefterlevnad: Omfattande kontroll av kollektivavtal och efterlevnad
- Multiprojekthantering: Hantera flera byggprojekt med separata företagsdatabaser
- Svensk Marknadsfokus: Specialbyggd för svensk byggbranschreglering
Systemarkitektur
SmartAudit är byggd som en multi-tenant plattform med projektbaserad dataseparation:
- Organisationer: Kundföretag som använder SmartAudit
- Projekt: Specifika byggprojekt inom organisationer
- Företag: Leverantörer/entreprenörer som kontrolleras
- Dataisolering: Projektbaserad dataseparation säkerställer integritet
Snabbstart med SmartAudit
Kom igång med SmartAudit på mindre än 15 minuter med denna guide.
1. Skapa organisation och projekt
- Logga in med ditt konto eller kontakta administratören
- Skapa eller välj din organisation
- Skapa ett nytt byggprojekt
- Tilldela projektmedlemmar och roller
2. Lägg till företag för revision
- Klicka på "Lägg till företag" i projektmenyn
- Ange grundläggande företagsinformation (org.nr, namn)
- Använd Excel-import för massuppladdning av flera företag
- Systemet validerar och sparar företagsinformationen
3. Starta AI-driven företagsforskning
1. Välj ett företag från listan
2. Klicka på "Importera AI-företagsdata"
3. AI söker automatiskt i 15+ källor (60-90 sekunder)
4. Få omfattande rapport om:
   ✓ Företagsregistrering och ägande
   ✓ Ekonomisk information
   ✓ Kollektivavtalsstatus
   ✓ Arbetsmiljöefterlevnad
   ✓ Kreditbetyg och ekonomisk hälsa
Tips: AI-forskningen sparas automatiskt och behöver inte upprepas för samma företag.
👥 Användarroller & Behörigheter
Rollhierarki
| Roll |
Behörigheter |
Användningsfall |
| Admin |
Hantera organisationsanvändare och projekt |
Organisationsadministratör |
User |
Genomför riskanalyser och revisioner |
Revisor |
🏢 Företagshantering
Hantera leverantörer och entreprenörer som revideras i dina byggprojekt.
Företagsdatastruktur
- Grundinformation: Namn, organisationsnummer, kontaktuppgifter
- Projektassociation: Länkad till specifika byggprojekt
- Hierarkisk struktur: Moder-dotterbolagsrelationer
- Kontaktinformation: Utsedda kontakter och kommunikationsdetaljer
- Riskbedömningsdata: Arbetsmiljöefterlevnad och ekonomisk risk
- Revisionshistorik: Alla revisioner genomförda på företaget
Huvudfunktioner
1. Excel Import
- Massimport av företag från Excel-kalkylblad
- Mallbaserad för konsekvent data
- Smart detektering och sammanslagning av dubbletter
- Automatisk projekttilldelning
- Datavalidering under importprocess
2. Företagssökning & Filtrering
- Sök efter namn, organisationsnummer eller andra fält
- Filtrera efter projekttillhörighet
- Sortera efter risknivå, status eller datum
🤖 AI-driven Företagsforskning
Automatisk företagsforskning med svenska datakällor för omfattande due diligence.
Information som Samlas In
- Företagsregistrering: Registreringsdetaljer och juridisk status
- Ägandestruktur: Verkliga huvudmän och ägare
- Ekonomisk data: Omsättning, antal anställda, lönsamhet
- Kreditbetyg: Ekonomisk hälsa och kreditvärdighet
- Kollektivavtalsstatus: Status och typ av kollektivavtal
- Arbetsmiljöefterlevnad: Historik av efterlevnad
- Arbetsmiljöförseelser: Överträdelser och varningar
- Branschrykte: Mediaomtal och rykte
Hur det Fungerar
- Klicka på "Importera AI-företagsdata" på företagsdetaljsidan
- AI utför webbsökning
- Resultat sparas i databasen för omedelbar hämtning
- Komplett rapport genererad
- Data cachas för att undvika upprepade sökningar
Prestanda: Komplett företagsforskning på 60-90 sekunder med realtids förloppsuppdateringar.
⚖️ Arbetsmiljöbedömning
Omfattande bedömning av leverantörers efterlevnad av svenska arbetslagar.
Bedömningskriterier
- Kollektivavtalsstatus: Krävd och faktisk status
- F-skatt: Svensk skatteregistrering
- Momsregistrering: Giltig momsregistrering
- Arbetsgivarregistrering: Registrerad som arbetsgivare
- Arbetsgivaravgifter: Rimliga avgiftsbelopp
- Skuldnivåer: Procent av skuld i förhållande till omsättning
- Betalningsanmärkningar: Historik av betalningsförseelser
- Kreditbetyg: Ekonomisk kreditvärdighet
Risknivåer
| Risknivå |
Beskrivning |
| Låg Risk |
Full efterlevnad, god ekonomisk ställning |
| Medel Risk |
Mindre problem, mestadels efterlevnad |
| Hög Risk |
Betydande efterlevnadsproblem eller ekonomiska problem |
| Kritisk Risk |
Allvarliga överträdelser, konkursrisk, bristande efterlevnad |
Bedömningsmetoder
- Manuell Bedömning: Fyll i frågeformulär manuellt
- AI-bedömning: Automatisk forskning och analys (60-90 sekunder)
- Validering: Systemet validerar och beräknar riskpoäng
🔗 Infobric Excel-Import
Importera företagsdata från Infobric via Excel-export.
Så fungerar det
- Exportera från Infobric: Använd Infobricsexportfunktion för att skapa en Excel-fil med företagsdata
- Importera till SmartAudit: Ladda upp Excel-filen via SmartAudits importfunktion
- Automatisk bearbetning: Systemet läser företagsinformation, status och hierarki
- Validering: Data valideras och mappas till SmartAudits datastruktur
Vad importeras
- Företagsinformation: Namn, organisationsnummer, kontaktuppgifter
- Status: Nuvarande status och bedömningar från Infobric
- Hierarki: Moder-dotterbolagsrelationer och projektstruktur
- Metadata: Datum, ansvariga och övrig relevant information
Fördelar
- Snabb migrering: Överför flera företag samtidigt från Infobric
- Bevarad struktur: Hierarki och relationer bibehålls
- Undvik dubbelarbete: Ingen manuell datainmatning krävs
- Datakonsistens: Säkerställ att data överensstämmer mellan systemen
Tips: Se till att Excel-exporten från Infobric innehåller alla nödvändiga fält för bästa resultat vid import.
📋 Revisionsflöden
Hantera hela revisionsprocessen från skapande till slutförande.
Revisionslivscykel
- Planering: Skapa revision och tilldela revisor
- Förberedelse: Samla företagsinformation och dokumentation
- Genomförande: Slutför frågeformulär och ladda upp dokument
- Granskning: Granska fynd och riskbedömningar
- Rapportering: Generera och distribuera revisionsrapporter
- Uppföljning: Spåra åtgärdspunkter och korrigeringar
Revisionsstatus
- Planerad: Revision skapad, inte påbörjad
- Pågående: Aktivt arbete pågår
- Under Granskning: Väntar på managergranskning
- Godkänd: Revision slutförd och godkänd
- Återöppnad: Kräver ytterligare arbete
📝 Frågeformulär
Intelligent frågeformulär för revision av arbetsrättsliga villkor med AI-baserad riskbedömning.
Frågeformulärstruktur
- Statiska frågor: Grundläggande frågor om arbetsrättsliga rutiner, kollektivavtal, lönehantering och arbetsmiljö
- Dynamiska frågor: AI-genererade följdfrågor baserade på identifierade risker
Frågeformulärfunktioner
- Flera frågetyper (text, flerval, datum, fil)
- Automatisk riskbaserad frågegenererering
- Filuppladdning för dokumentation
- Progresspårning och validering
- Möjlighet att uppdatera svar
📊 Revisionsrapporter
Generera professionella revisionsrapporter med komplett analys.
Rapportinnehåll
- Sammanfattning: Översikt över revisionsfynd
- Företagsinformation: Komplett företagsprofil
- Riskbedömning: Detaljerad riskanalys
- Efterlevnadsstatus: Arbetsmiljölag och regelstatus
- Rekommendationer: Åtgärdspunkter och förbättringar
- Bilagor: Stödjande dokumentation
Exportalternativ
- PDF: Professionellt formaterade rapporter
📄 Dokumentuppladdning
Ladda upp stödjande dokumentation för revisioner.
Dokumenttyper som stöds
- Certifikat: F-skatt, ISO-certifikat, etc.
- Försäkringar: Ansvarsförsäkring, arbetsgivaransvar
- Kollektivavtal: Avtalskopior
- Ekonomiska dokument: Bokslut, räkenskaper
- Säkerhetsdokumentation: Arbetsmiljöplaner, riskbedömningar
- Referensprojekt: Tidigare arbete och referenser
Filformat
- PDF, DOCX, DOC, TXT
- XLSX, XLS, CSV
- JPG, PNG (med OCR)
- Max 25MB per fil
💡 Bästa Praxis
För effektiva revisioner
- Använd AI-företagsforskning först för att spara tid
- Samla all dokumentation innan du påbörjar revisionen
- Sätt realistiska deadlines
- Granska och följ upp regelbundet
För datakvalitet
- Använd organisationsnummer för exakt företagsidentifiering
- Verifiera AI-resultat mot officiella källor
- Håll företagsinformation uppdaterad
- Dokumentera alla fynd med källor
- Använd standardiserade frågeformulär
🆘 Support
Behöver du hjälp? Vi finns här för att hjälpa dig.
Kontakta oss
Svarstid: Vi strävar efter att svara inom 24 timmar under vardagar.
SmartInfra Accounts
SmartInfra Accounts är din centraliserade autentiserings- och prenumerationshanteringsplattform för alla SmartInfra-applikationer.
Ett konto ger dig tillgång till SmartURai, SmartAudit och andra SmartInfra-tjänster.
En Inloggning - Alla Applikationer: Inget behov av separata konton. Single Sign-On (SSO) över hela plattformen.
Huvudfunktioner
- Centraliserad Autentisering: Ett konto för alla SmartInfra-tjänster
- Prenumerationshantering: Hantera alla dina applikationsprenumerationer på ett ställe
- Säker Betalning: Stripe-integration med PCI Level 1-certifiering
- Tvåfaktorsautentisering: Valfritt extra säkerhetslager
- Enterprise-Klar: Företagsprofiler med organisationsnummer och fakturahantering
Skapa Ditt Konto
Steg-för-steg Guide
- Besök registreringssidan på
accounts.smartinfra-nordic.se/register/
- Fyll i dina kontouppgifter:
- Användarnamn: Välj ett unikt användarnamn (bokstäver, siffror, @/./+/-/_ endast)
- E-post: Använd en giltig e-postadress för kontoåterställning och notifikationer
- Lösenord: Skapa ett starkt lösenord (minst 8 tecken)
- Lägg till företagsinformation (valfritt):
- Företagsnamn
- Organisationsnummer (för svenska företag)
- Telefonnummer
- Adress
- Klicka på "Sign Up" för att skapa ditt konto
- Du loggas automatiskt in och omdirigeras till prenumerationsval
💡 Pro Tips: Använd en företags-e-post om du registrerar dig för ditt företag. Detta gör det enklare att hantera prenumerationer och ta emot fakturor.
Logga In
Din Första Inloggning
- Navigera till
accounts.smartinfra-nordic.se/login/
- Ange ditt användarnamn och lösenord
- Klicka på "Sign In"
- Du omdirigeras till applikationsväljaren där du kan komma åt dina prenumererade applikationer
Om du har 2FA aktiverat: Ange 6-siffrig kod från din autentiseringsapp efter ditt lösenord.
Uppdatera Din Profil
Håll din kontoinformation uppdaterad:
- Logga in på ditt konto
- Klicka på ditt användarnamn i den övre navigeringsmenyn
- Välj "Profile"
- Uppdatera någon av följande information:
- E-postadress
- Telefonnummer
- Företagsnamn
- Organisationsnummer
- Faktureringsadress
- Klicka på "Update Profile" för att spara ändringar
Viktigt: Ändring av din e-postadress påverkar lösenordsåterställningar och faktureringsnotifikationer.
Ändra Lösenord
Om Du Är Inloggad
- Gå till din Profilsida
- Hitta avsnittet "Change Password"
- Ange ditt nuvarande lösenord
- Ange ditt nya lösenord (två gånger för bekräftelse)
- Klicka på "Change Password"
Om Du Glömt Lösenordet
- Gå till lösenordsåterställningssidan:
accounts.smartinfra-nordic.se/password-reset/
- Ange din registrerade e-postadress
- Klicka på "Send Reset Link"
- Kontrollera din e-postinkorg (och skräppostmapp)
- Klicka på återställningslänken i e-postmeddelandet
- Ange ditt nya lösenord
- Bekräfta det nya lösenordet och skicka
Lösenordskrav
- Minst 8 tecken
- Kan inte vara för likt ditt användarnamn eller e-post
- Kan inte vara ett vanligt använt lösenord
- Bör innehålla en blandning av bokstäver, siffror och symboler
Ta Bort Ditt Konto
För att permanent ta bort ditt SmartInfra-konto:
- Kontakta vårt supportteam på support@smartinfra-nordic.se
- Vi hjälper dig med:
- Avsluta alla aktiva prenumerationer
- Exportera din data (om det behövs)
- Bekräfta permanent kontoborttagning
⚠️ Varning: Kontoborttagning är permanent och kan inte ångras. All din data kommer att tas bort permanent från våra system.
Prenumerera på Applikationer
Hur Man Prenumererar
- Logga in på ditt SmartInfra-konto
- Navigera till prenumerationssidan eller klicka "Subscribe" från hemsidan
- Välj den applikation du vill använda:
- SmartURai: AI-driven byggrätt analys plattform
- SmartAudit: Intelligent revision och efterlevnadshantering
- Välj en prenumerationsplan:
- Small Plan: Grundnivå åtkomst för små projekt
- Monthly Plan: Flexibel månad-till-månad fakturering
- Yearly Plan: Årlig fakturering med kostnadsbesparingar
- Ange betalningsinformation (Stripe - säker betalning)
- Granska din beställning och bekräfta
- Börja använda din applikation omedelbart!
Hantera Fakturering
Visa Fakturor
- Gå till din Prenumerations Dashboard
- Klicka på "Manage Billing" eller "Billing Portal"
- Du omdirigeras till Stripe Customer Portal
- Visa alla tidigare fakturor
- Ladda ner fakturor som PDF för dina register
Uppdatera Betalningsmetod
- Öppna Stripe Customer Portal från din Prenumerationssida
- Klicka på "Add payment method"
- Ange dina nya kortuppgifter
- Ställ in det som standardbetalningsmetod (valfritt)
- Ta bort gamla kort om det behövs
Förstå Din Faktura
- Faktureringsperiod: Månatliga planer debiteras samma dag varje månad. Årliga planer debiteras årligen på din prenumerationsdag.
- Fakturauppgifter: Inkluderar moms/skatter om tillämpligt
- Misslyckade Betalningar: Automatisk återförsök efter misslyckad betalning. E-postnotifikation skickas.
Provperioder
Vissa SmartInfra-applikationer erbjuder provperioder:
- Provperiod: 7 dagar för alla produkter
- Ingen Betalning Krävs: Vissa provperioder kräver inte kort i förväg
- Full Åtkomst: Komplett åtkomst till alla funktioner under provperioden
- Avbokning: Avbryt när som helst under provperioden utan avgifter
- Konvertering: Konverteras automatiskt till betald prenumeration när provperioden slutar
- Påminnelse: E-post skickas innan provperioden går ut
Avbryt Prenumeration
Så Här Avbryter Du
- Besök din Prenumerations Dashboard
- Hitta prenumerationen du vill avbryta
- Klicka på "Cancel Subscription"
- Bekräfta avbokningen
- Ta emot bekräftelse via e-post
Viktig Information: Din prenumeration förblir aktiv till slutet av din nuvarande faktureringsperiod. Inga återbetalningar för delperioder. Du kan återprenumerera när som helst.
Tvåfaktorsautentisering (2FA)
Konfigurera 2FA
- Logga in på ditt konto
- Gå till din Profilsida
- Hitta avsnittet "Two-Factor Authentication"
- Klicka på "Enable 2FA" eller "Setup 2FA"
- Skanna QR-koden med din autentiseringsapp
- Ange 6-siffrig verifieringskod
- Spara dina backup-koder på en säker plats
- Bekräfta att 2FA är aktiverat
Rekommenderade Autentiseringsappar
- Google Authenticator (iOS/Android)
- Authy (iOS/Android/Desktop)
- Microsoft Authenticator (iOS/Android)
- 1Password
- LastPass Authenticator
Förlorad Autentiseringsenhet
Om du förlorar åtkomst till din autentiseringsenhet:
- Använd en backup-kod för att logga in
- Inaktivera 2FA
- Återaktivera 2FA med din nya enhet
- Spara nya backup-koder
Om du inte har backup-koder: Kontakta support på support@smartinfra-nordic.se med verifiering av din identitet.
Säkerhetsrutiner
Lösenordssäkerhet
- Använd ett unikt lösenord (inte använt på andra webbplatser)
- Minst 12 tecken rekommenderas
- Inkludera versaler, gemener, siffror och symboler
- Undvik personlig information (födelsedagar, namn, etc.)
- Överväg att använda en lösenordshanterare
- Ändra ditt lösenord om du misstänker kompromiss
Kontosäkerhet
- Aktivera tvåfaktorsautentisering
- Dela aldrig ditt lösenord eller 2FA-koder
- Logga ut när du använder delade datorer
- Granska inloggningsaktivitet regelbundet
- Var försiktig med nätfiske-e-post
- Verifiera URL:er innan du anger autentiseringsuppgifter
- Använd endast HTTPS-anslutningar
Dataskydd & Integritet
Vilken Data Samlar Vi In
- Kontoinformation: Användarnamn, e-post, lösenord (krypterat)
- Profiluppgifter: Namn, företag, telefon, adress (valfritt)
- Faktureringsinformation: Betalningshistorik, fakturor (lagras av Stripe)
- Prenumerationsdata: Aktiva planer, användning, åtkomstloggar
- Integrationsdata: Backend-användar-ID:n, tenant-ID:n för applikationsåtkomst
Hur Vi Använder Din Data
- Tillhandahålla och förbättra våra tjänster
- Bearbeta betalningar och generera fakturor
- Skicka viktiga kontonotifikationer
- Tillhandahålla kundsupport
- Säkerställa plattformssäkerhet
- Följa juridiska skyldigheter
Hur Vi Skyddar Din Data
- Lösenord krypterade med branschstandard hashning (PBKDF2)
- SSL/TLS-kryptering för all dataöverföring
- Betalningsbehandling genom PCI-kompatibel Stripe
- Regelbundna säkerhetsrevisioner
- Begränsad medarbetaråtkomst till känslig data
- Säker serverinfrastruktur
GDPR Efterlevnad
SmartInfra® är engagerad i GDPR-efterlevnad:
- Laglig grund för databehandling
- Dataminimeringspr inciper
- Rätt till åtkomst och portabilitet
- Rätt till radering ("rätt att bli glömd")
- Dataskydd genom design
- Transparenta integritetsmetoder
Dina Datarättigheter
- Få tillgång till dina personuppgifter
- Begära datakorrigeringar
- Exportera din data
- Begära kontoborttagning
- Välja bort marknadsföringskommunikation
- Lämna in integritetsklagomål
Single Sign-On (SSO)
Ditt SmartInfra-konto ger sömlös åtkomst till alla applikationer:
Fördelar
- Ett konto för alla SmartInfra-tjänster
- Inget behov av att skapa separata konton
- Automatisk autentisering när du byter appar
- Enhetlig profil över alla tjänster
- Centraliserad prenumerationshantering
Hur Det Fungerar
- Logga in på SmartInfra Accounts
- Navigera till applikationsväljaren
- Klicka på valfri prenumererad applikation
- Du loggas automatiskt in
- Växla mellan appar utan att autentisera igen
SmartURai Applikation
SmartURai är en AI-driven plattform som analyserar byggrätt och zonbestämmelser,
hjälper arkitekter, utvecklare och fastighetsägare förstå utvecklingspotential.
Nyckelfunktioner
- AI-analys av detaljerade utvecklingsplaner (Detaljplaner)
- Fastighetssökning efter adress eller koordinater
- Beräkningar av byggrätt
- Tolkning av zonbestämmelser
- Visuella planöverlagringar
- Nedladdningsbara rapporter
Åtkomst: smartur.smartinfra-nordic.se eller via app-väljaren
SmartAudit Applikation
SmartAudit tillhandahåller intelligenta revisions- och efterlevnadshanteringsverktyg för organisationer.
Nyckelfunktioner
- Automatiserad efterlevnadskontroll
- Hantering av revisionsspår
- Riskbedömningsverktyg
- Rapportgenerering
- Efterlevnadsdashboards
- Dokumenthantering
Felsökning
Inloggningsproblem
Problem: Kan inte logga in på mitt konto
Lösningar:
- Verifiera autentiseringsuppgifter (användarnamn och lösenord är skiftlägeskänsliga)
- Kontrollera Caps Lock
- Använd länken "Forgot Password" om det behövs
- 2FA-problem: Se till att autentiseringsappens tid är synkroniserad
- Rensa webbläsarens cache och cookies
- Prova inkognitoläge/privat surfning
- Prova en annan webbläsare
Lösenordsåterställningsproblem
Problem: Får inte e-post för lösenordsåterställning
- Kontrollera skräppost/skräpmapp
- Vänta 5-10 minuter (e-postfördröjningar kan förekomma)
- Verifiera att du angav rätt e-postadress
- Kontrollera om e-post är från
noreply@smartinfra-nordic.se
- Lägg till vår domän i din e-postvitlista
- Begär en ny återställningslänk
Betalnings- & Faktureringsproblem
Problem: Betalning nekad
- Otillräckliga medel: Kontrollera ditt kontosaldo
- Kort utgånget: Uppdatera din betalningsmetod
- Felaktiga uppgifter: Verifiera kortnummer, CVV och utgångsdatum
- Banksäkerhet: Din bank kan ha blockerat transaktionen - kontakta din bank
- Kortbegränsningar: Vissa kort tillåter inte internationella eller onlinetransaktioner
- Prova alternativt kort
Applikationsåtkomstproblem
Problem: Kan inte komma åt prenumererad applikation
- Verifiera prenumerationsstatus i Dashboard
- Se till att betalningen inte är förfallen
- Rensa webbläsarens cache och cookies
- Prova en annan webbläsare
- Logga ut och logga in igen
Vanliga Frågor
Vad är SmartInfra Accounts?
SmartInfra® Accounts är en centraliserad autentiserings- och prenumerationshanteringsplattform för alla SmartInfra®-applikationer. Ett konto ger dig tillgång till SmartURai, SmartAudit och andra SmartInfra®-tjänster.
Behöver jag separata konton för varje SmartInfra-applikation?
Nej! Ett SmartInfra-konto fungerar över alla våra applikationer. Du behöver bara separata prenumerationer för varje app du vill använda.
Är SmartInfra Accounts gratis?
Att skapa ett SmartInfra-konto är gratis. Du betalar endast för prenumerationer på specifika applikationer som SmartURai eller SmartAudit.
Kan jag testa innan jag prenumererar?
Vissa applikationer erbjuder gratis provperioder. Kontrollera prenumerationssidan för aktuell provperiodstillgänglighet. Du kan avbryta under provperioden utan att debiteras.
Vilka betalningsmetoder accepterar ni?
Vi accepterar alla stora kredit- och betalkort genom Stripe, inklusive Visa, Mastercard, American Express, Discover med flera.
Är min betalningsinformation säker?
Ja! All betalningsbehandling hanteras av Stripe, en PCI Level 1-certifierad betalningsbehandlare. Vi lagrar aldrig dina fullständiga kortuppgifter på våra servrar.
Hur ändrar jag min e-postadress?
Gå till din Profilsida och uppdatera din e-postadress. Se till att du har åtkomst till den nya e-posten eftersom den kommer att användas för kontoåterställning.
Bör jag aktivera tvåfaktorsautentisering?
Vi rekommenderar starkt att aktivera 2FA för förbättrad kontosäkerhet, speciellt om du har aktiva prenumerationer eller känslig data i dina applikationer.
Vilka webbläsare stöds?
Vi stödjer de senaste två versionerna av Chrome, Firefox, Safari och Edge. För bästa upplevelse, håll din webbläsare uppdaterad.